Version 3.0
February 2021
![]()
Table of Contents
- What is GeneLab?
- An Overview of the User Interface
GeneLab Home Page
GeneLab Data System Menu Selection - Search Utility in GeneLab Data System
Search Bar
Search Filters
Data Integration / Federation for Search Bar - GeneLab Data Repository
Metadata User Interface - Environmental Data
- Data Visualization of the GeneLab Data System
- User Account
Setting up a User Account - Collaborative Workspace
Workspace User Interface
Manage folders and files
Upload files and manage storage
Copy/Move folders and files
Share data and manage groups - Integrated Search and Federation APIs
- Data Submission Portal
What is GeneLab?
The GeneLab project is both a science collaboration initiative as well as a data system that provides a collaborative workspace with tools to analyze and visualize space relevant omics data. Our primary goal is to maximize the utilization of the valuable biological research conducted aboard the International Space Station (ISS) by collecting genomic, transcriptomic, proteomic, and metabolomics data known as “omics”. One important aspect of GeneLab’s primary goal is to help the scientific community and the population at large gain new knowledge from space omics data. By providing a portal linking processed data to flight parameters, GeneLab enables exploration of the molecular network responses of terrestrial biology to the space environment. This allows researchers to understand the complex responses of biological systems to the space environment. GeneLab data will be useful for the development of countermeasures, monitoring the microbes that colonize the space station, understanding how plants (food) could be modified to grow better in space, and unraveling the responses of humans and other organisms to the combined effects of altered gravity and space radiation.
An Overview of the User Interface
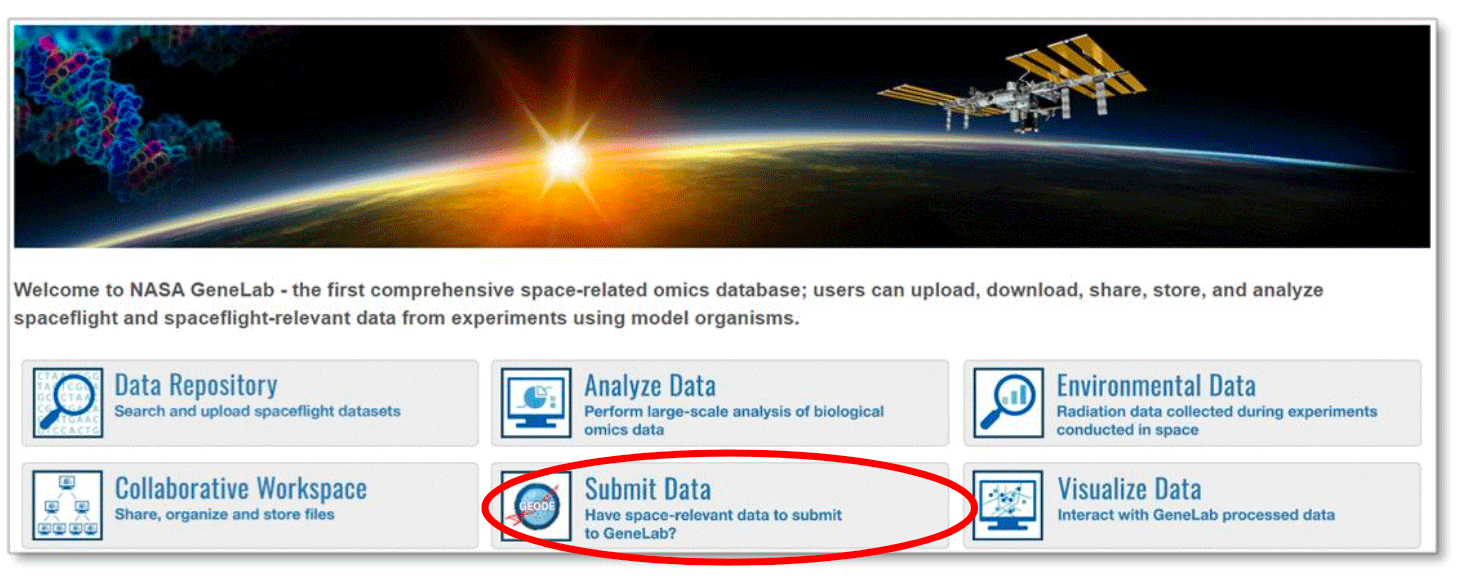
GeneLab Home Page: https://genelab.nasa.gov/
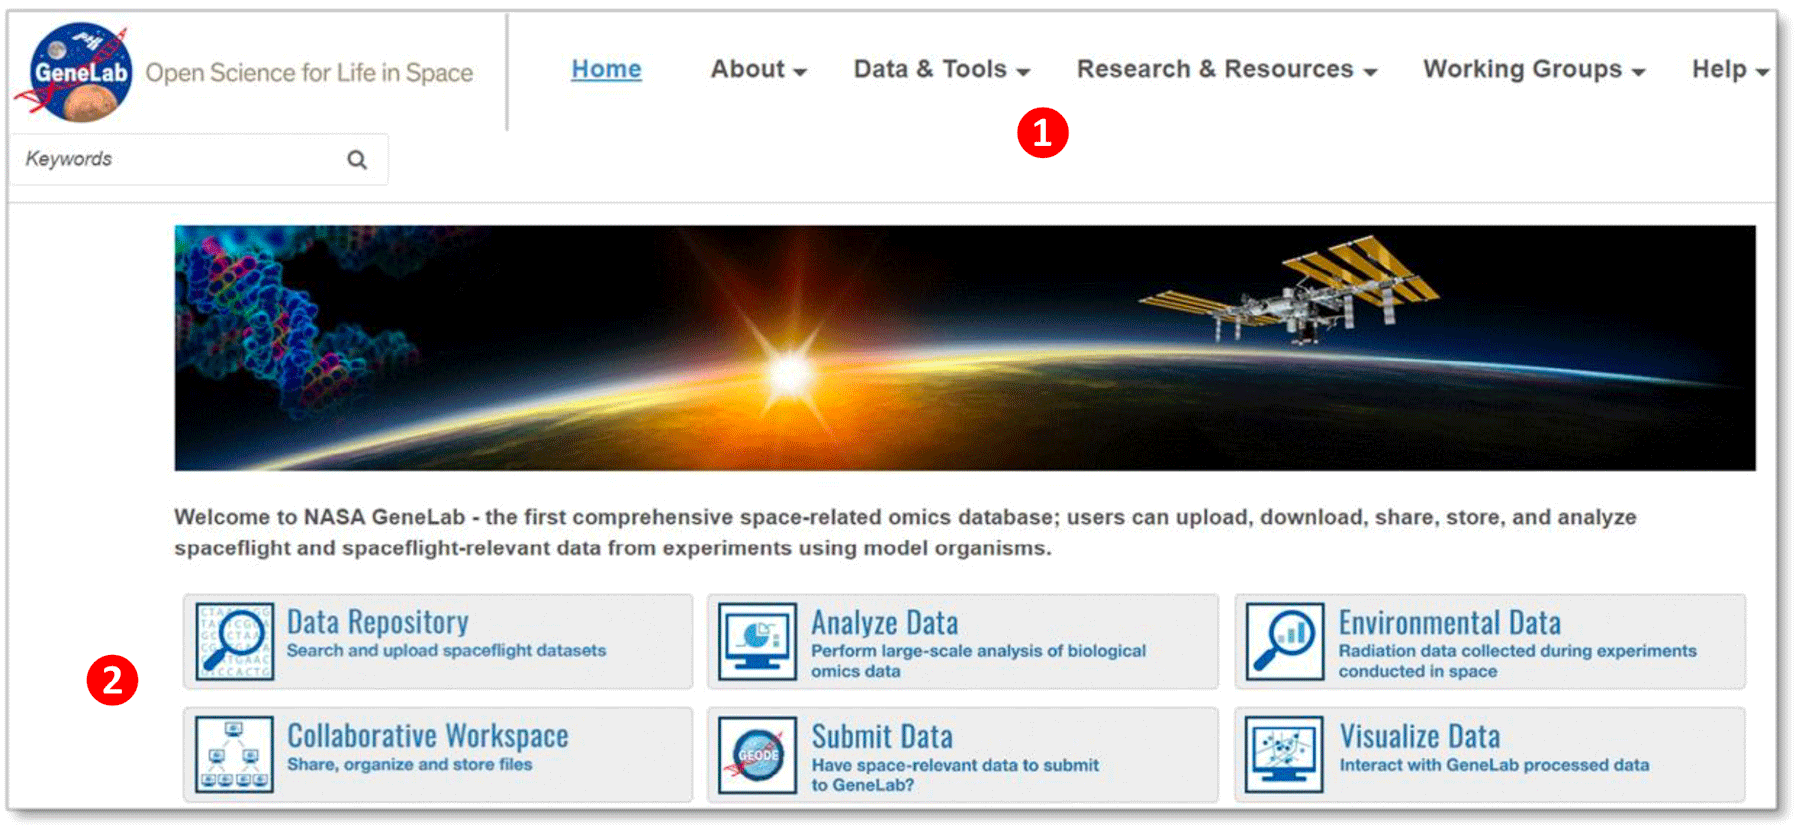
① Navigation menu – click on any of the options to navigate through the different pages
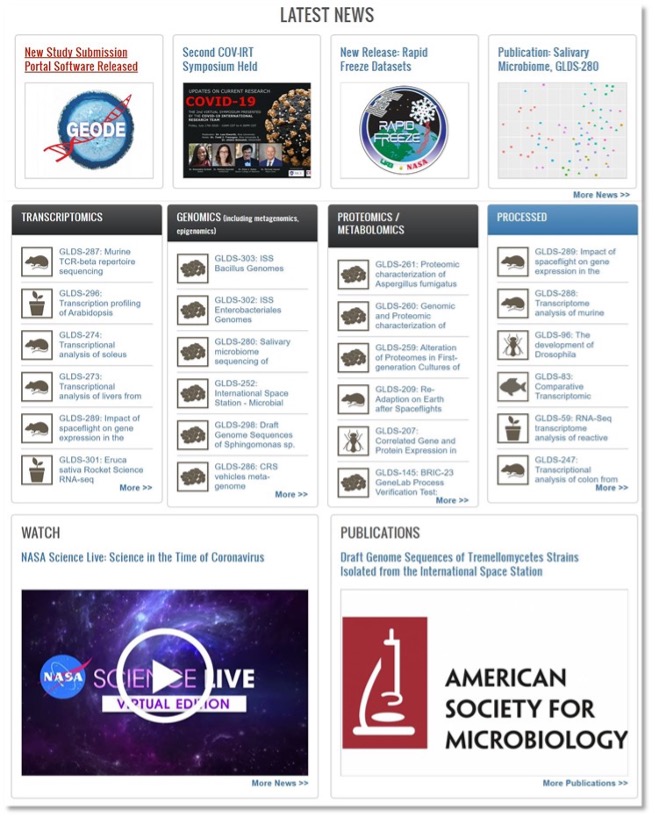
- Home: GeneLab home page includes the navigation menu, Latest data releases, Latest news, Spotlight features, Research opportunities and recent publications.
- About: Click on the about page to learn more about the GeneLab project, International Space Station, space biology experiments, GeneLab’s Analysis Working Groups, our sponsors, and archived newsletters.
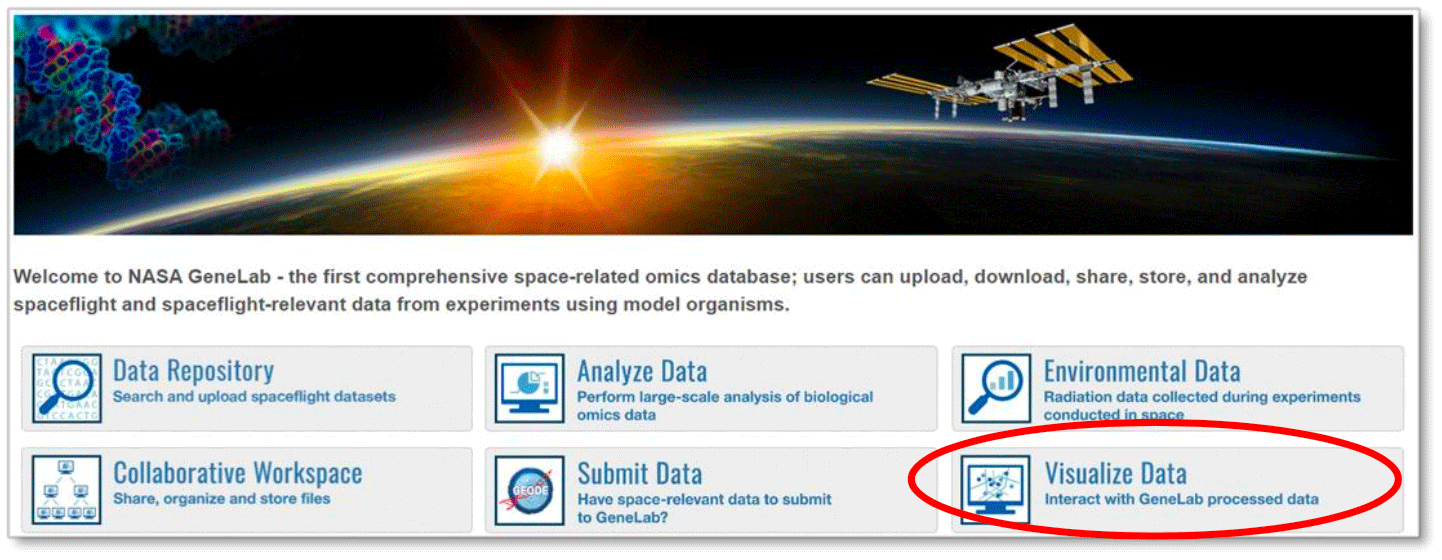
- Data & Tools: Links to all the available data and tools, including the Data Repository, Environmental Data, and Collaborative Workspace.
- Research & Resources: Links to publications, internship resources and other related NASA resources.
- Working Groups: Links to GeneLab’s Analysis Working Group (AWG) and Visualization Working Group (VWG).
- Help: Links to all the featured tutorials, Frequently Asked Questions (FAQs), and GeneLab contact information.
② GeneLab Data Systems buttons
Click on the featured buttons to navigate through the different pages and tools. These links will direct you to the Data Repository, Environmental Data, Collaborative Workspace, data submission webpage, and data visualization webpage.
Explore the GeneLab home page by scrolling down to find more information about the latest data releases, news, and events.
GeneLab Data Repository Menu Selection: https://genelab-data.ndc.nasa.gov/genelab/
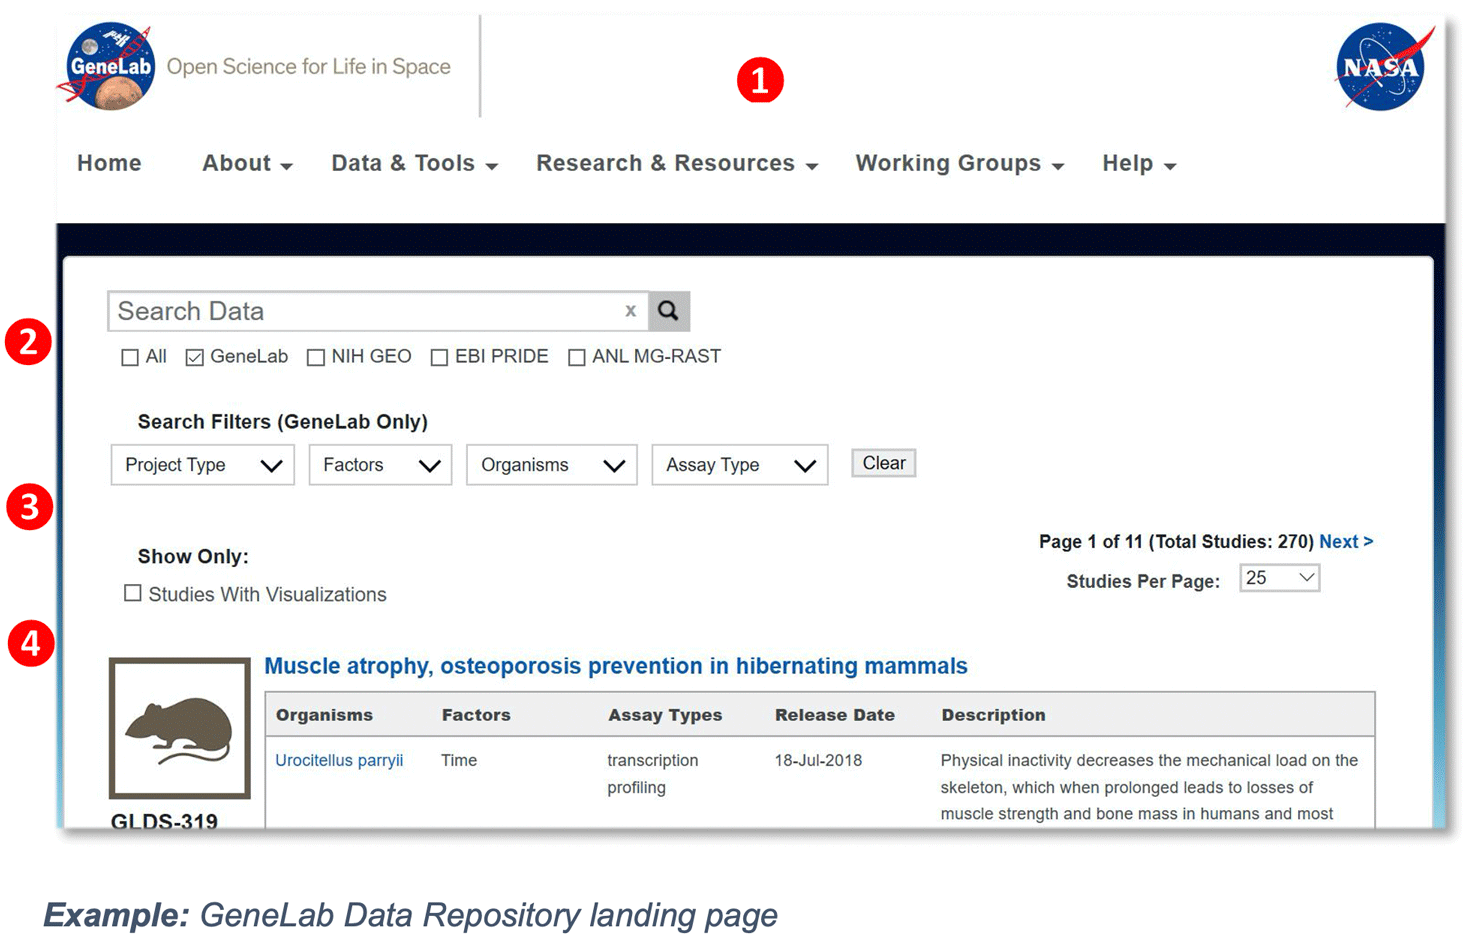
① GLDS Navigation menu – click on any of the options to navigate through the different pages
Home: GeneLab home page includes the navigation menu, Latest data releases, Latest news, Spotlight features, Research opportunities and recent publications.
About: Click on the about page to learn more about the GeneLab project, International Space Station, space biology experiments, GeneLab’s Analysis Working Groups, our sponsors, and archived newsletters.
Data & Tools: Links to all the available data and tools, including the Data Repository, Environmental Data, and Collaborative Workspace.
Research & Resources: Links to publications, internship resources and other related NASA resources.
Working Groups: Links to GeneLab’s Analysis Working Group (AWG) and Visualization Working Group (VWG).
Help: Links to all the featured tutorials, Frequently Asked Questions (FAQs), and GeneLab contact information.
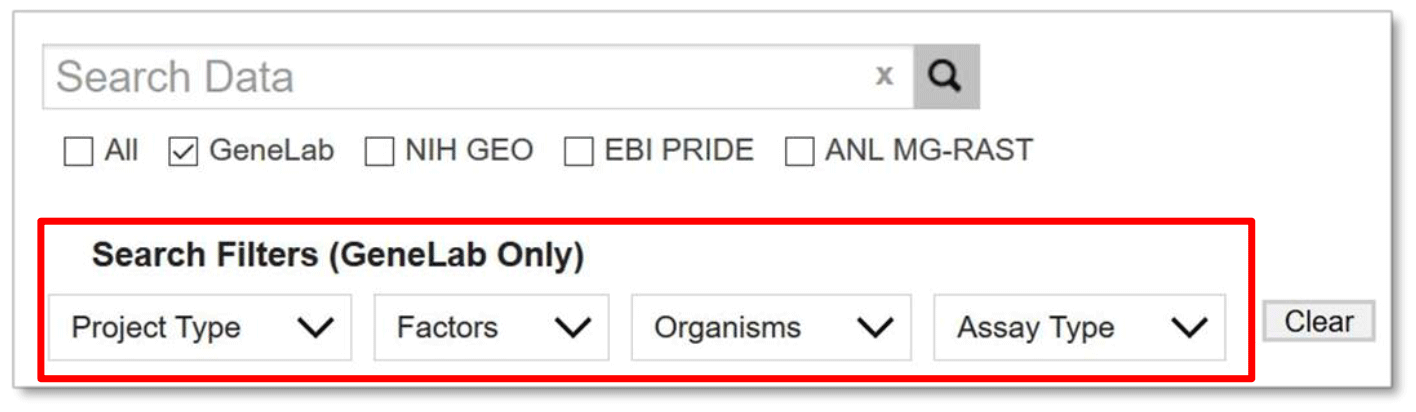
② Search Bar – provides the ability to perform searches across several omics databases, including GeneLab, NIH GEO, EBI PRIDE, and/or ANL MG-RAST.
③ Search Filters – provides the ability to search the GeneLab repository using filters such as ground vs. spaceflight studies, study factors, study organisms, and study assay type.
④ Data Visualization Dashboard – provides a visual representation of all the datasets housed in the GeneLab repository
Search Utility in GeneLab Data System
Search Bar
GeneLab Data Repository provides users a full-text search capability of the metadata for all datasets. Full-text search terms can be a single word or multiple words with either Boolean, wildcards (asterisks *), and/or string (text) literals. Note that the searches are case-insensitive with respect to search term(s). To perform a search, enter a keyword or set of keywords, in the search box and either press ‘Enter’ or use your mouse to select the magnifying glass icon.
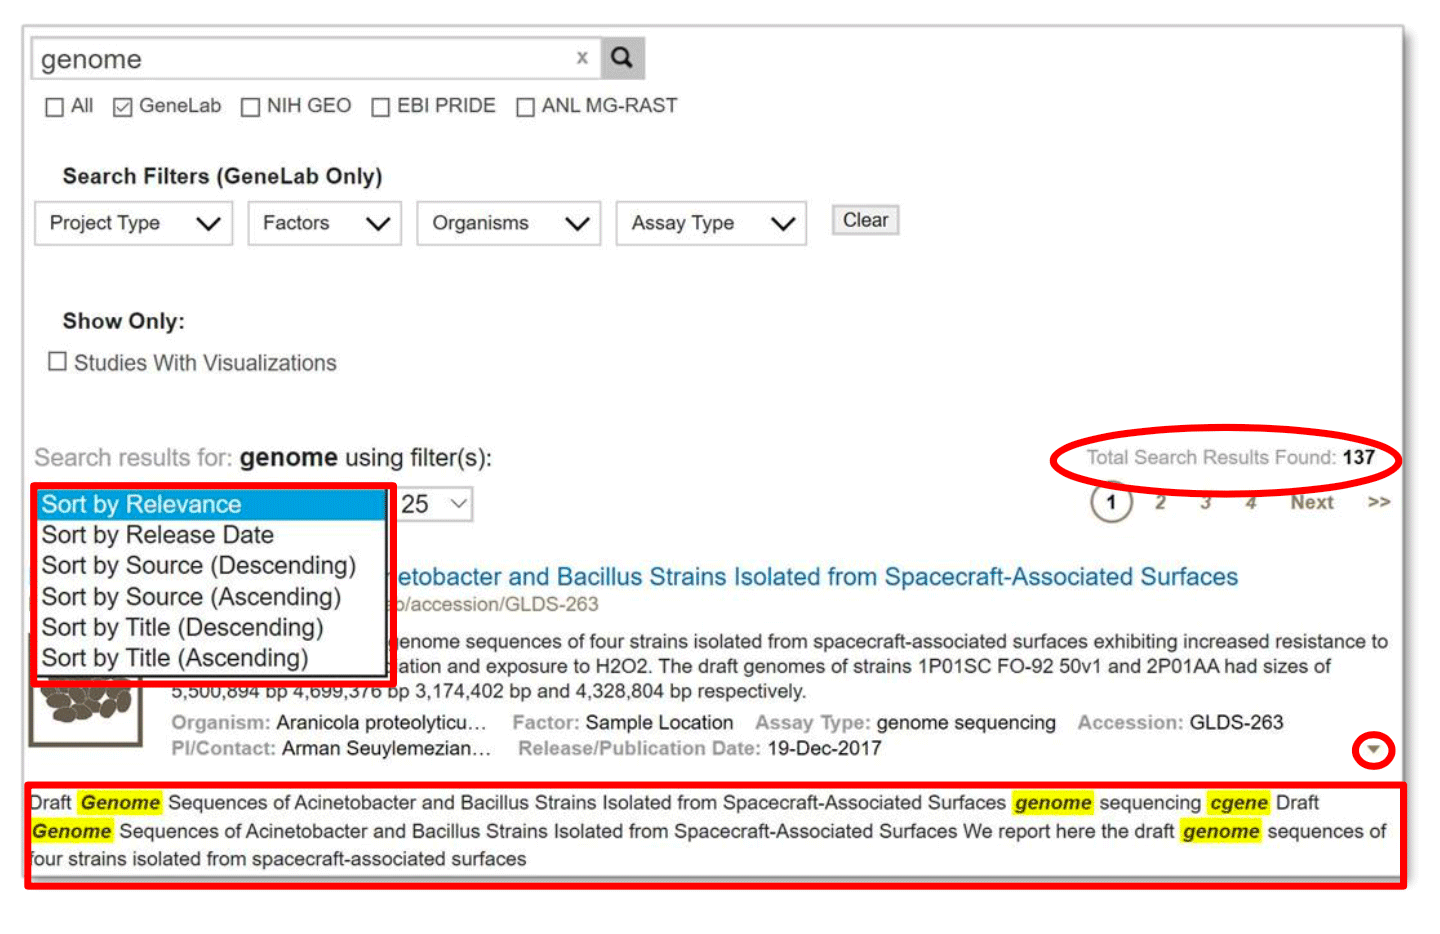
Search results can be sorted by relevance, release date, source, and title with either ascending or descending orders. In addition, to see an overview of the study metadata, click on the “ “ arrow, (near the right margin, circled in red above) to show highlighted keyword search relevance.
Click on a title to show the detailed metadata for that study. Use the page navigator on the top right corner to go the next page of search results. Below are some examples of searches.
Single term search:

Example: Search results from searching the single term ‘genome’
Multiple term search:
An example of a multiple term search is shown below. Search results will contain all of the search terms.
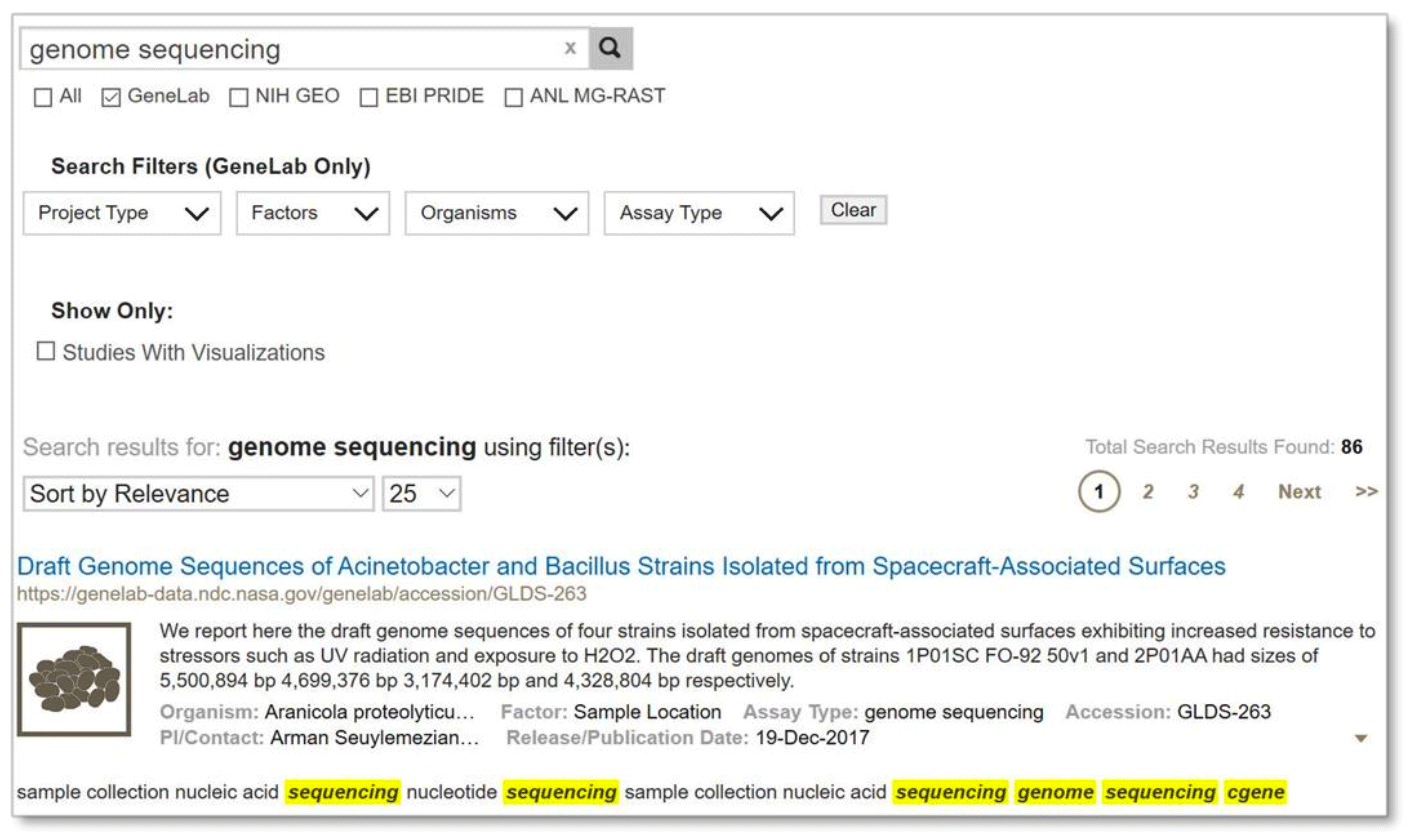
Example: Search results from searching on multiple terms ‘genome sequencing’
If multiple words are in double quotations then those words must match exactly in the order given, as shown below:

Example: Search results from searching the exact term “genome sequencing” by using quotation marks
Boolean operators (see table below) can be included with the search terms.
Boolean Operators
|
Operator |
|
|
AND |
ALL search terms must be present (default Boolean search) |
|
OR |
ANY of your search terms can be present |
|
NOT |
Exclude words from your search |
Below is a search using the ‘AND’ operator. Note that the resulting set is the same as searching for the terms ‘genome’ and ‘sequencing’ without the operator.
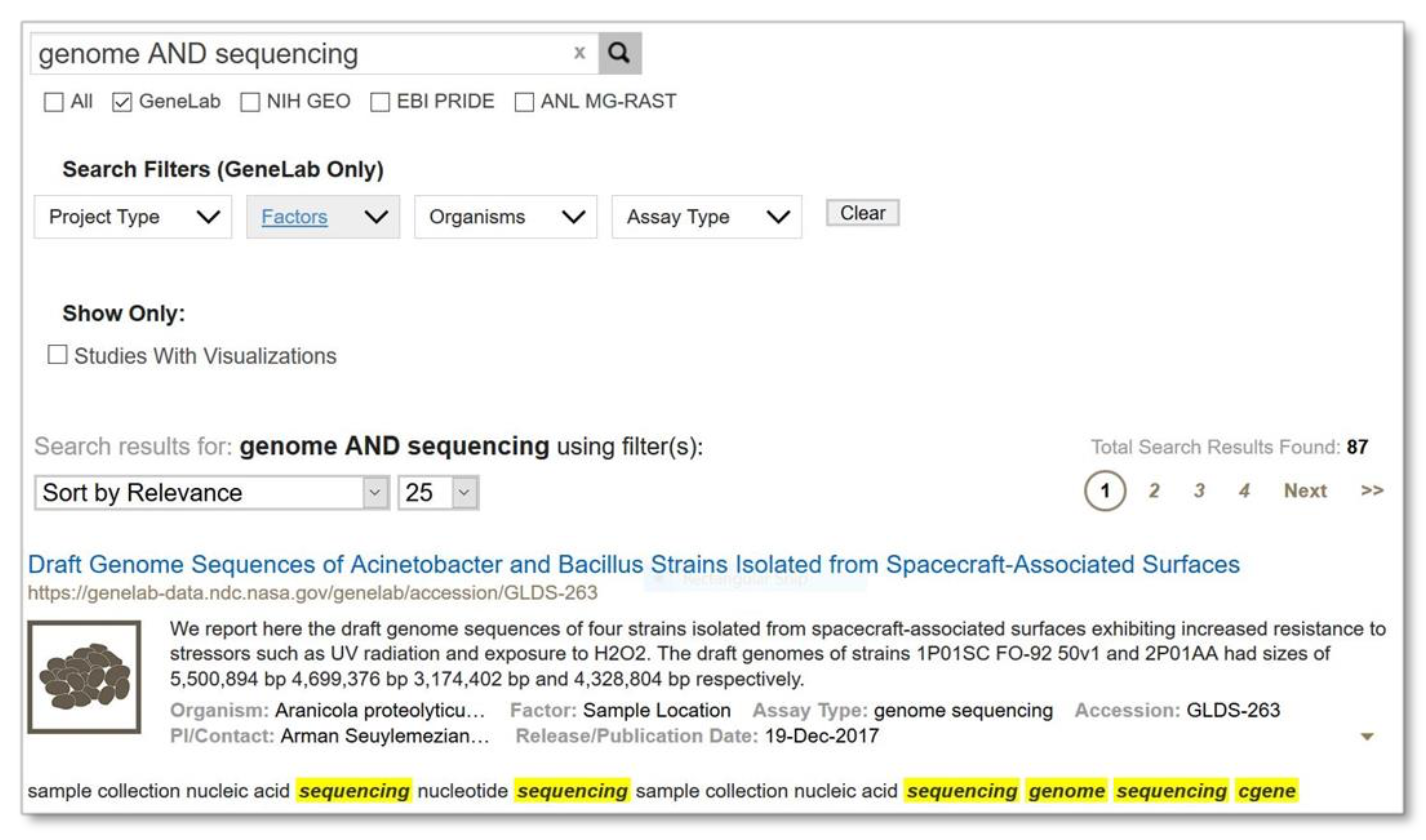
Example: Search results from using ‘AND’ operator to search on both terms ‘genome’ and ‘sequencing’
Please note that you may not use both the Boolean operators and double quotations together.
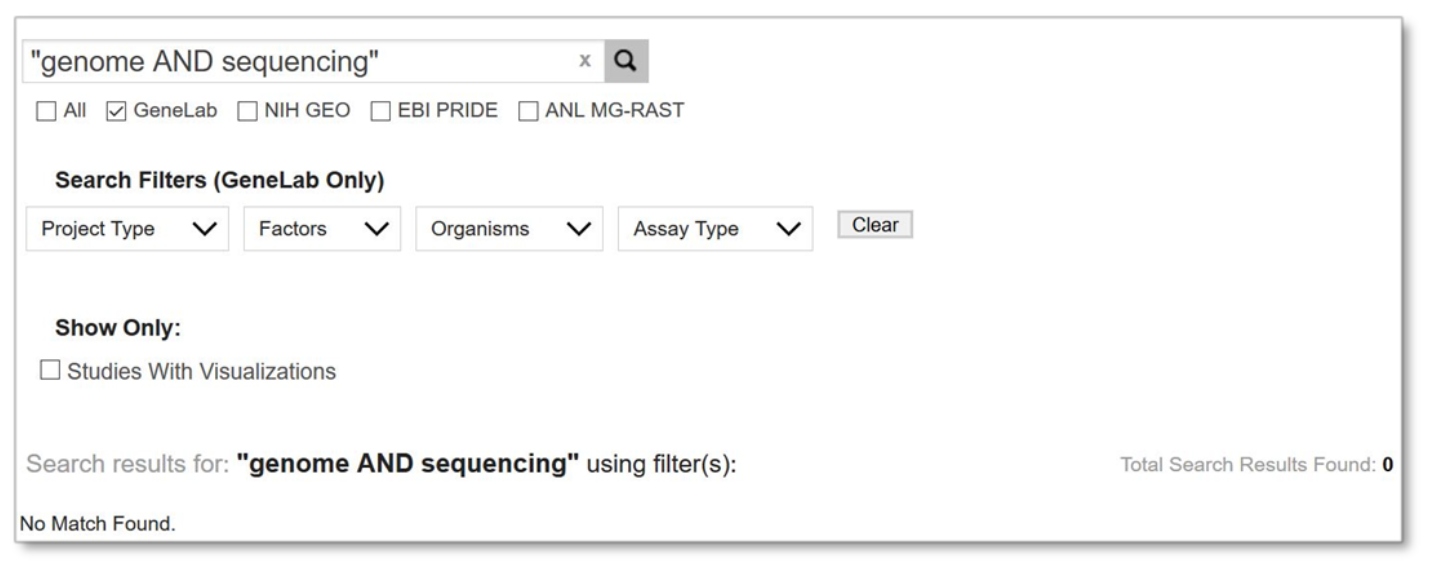
Example: No search results due to using incorrect techniques
Other search techniques:
- Exclude studies containing term(s) from your search using the minus prefix (-). This is the same as using the NOT operator.
Example: genome sequencing –mouse - Require term(s) in your search using the plus prefix (+). This is the same as using the AND operator.
Example: genome sequencing +bacillus 10 - Search on unspecified portions of search terms using an asterisk (*)
Example: geno* sequencing
In addition to searching the GeneLab Data Repository, federated data repositories can be included in the search as well. See below for more information on the federated data repositories.
Search Filters
GeneLab also provides some filters to assist in searching the GeneLab repository. The filters include: Project Type, Factors, Organisms, and Assay Types. The menus for each category are pre-populated with terms from datasets included in the GeneLab repository.
Note that you can use the filters without using any additional search terms.
Currently the search filters only work on filtering data housed in the GeneLab data repository.
Selecting a filter box opens a list of choices for that filter. Each time a filter is selected, the filter is immediately applied, possibly changing the number of search results shown. As the filter values are added, they are displayed as text above the results. The user can select multiple options from the same filter type. For example, filter your search by selecting ‘microgravity’ and then ‘age’ from the Factors menu. GeneLab searches for those studies that have either ‘microgravity’ OR ‘age’ factors.
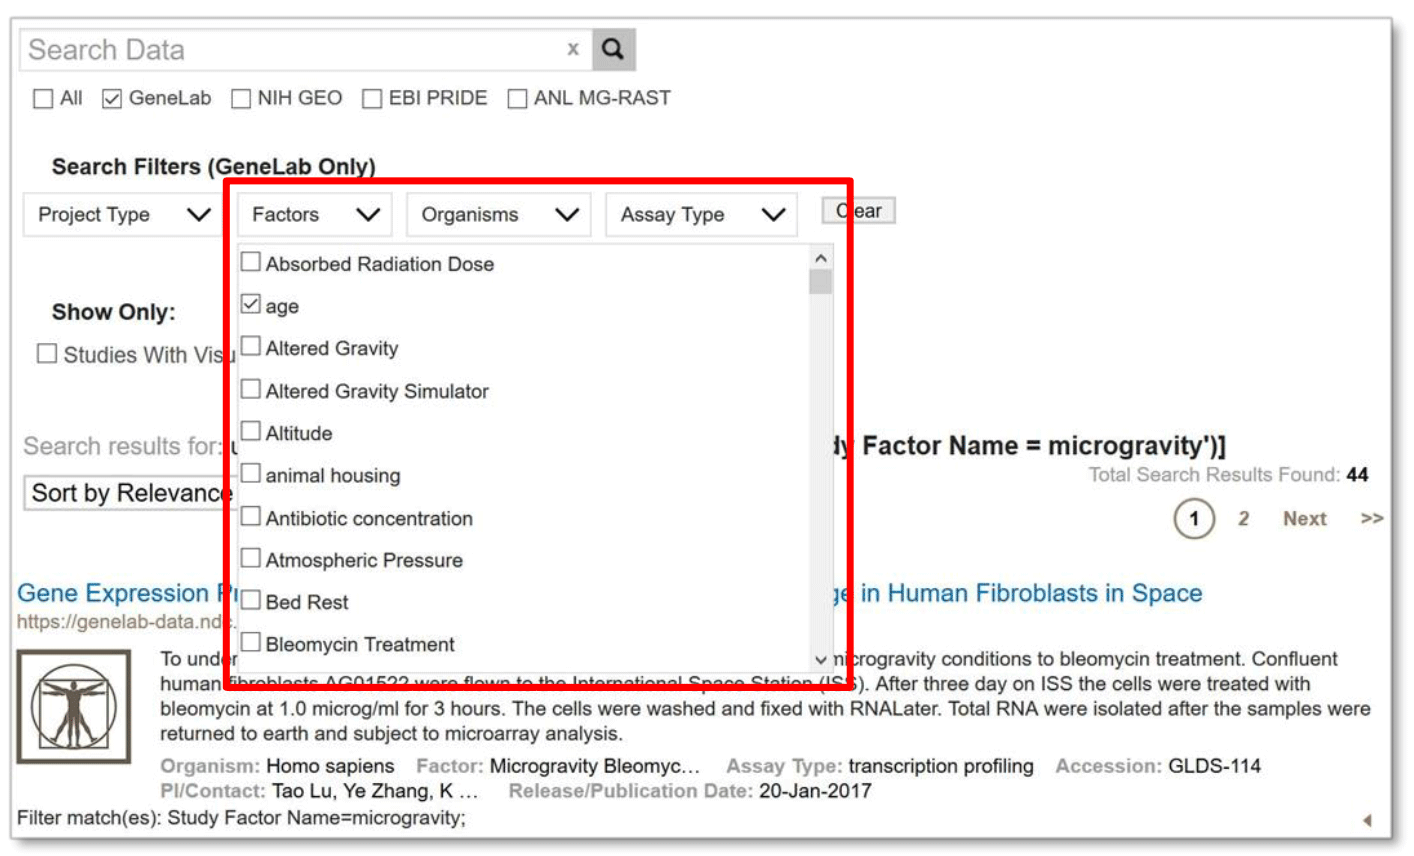
Example: Filter Search by selecting 'Microgravity' and 'Age' under Factors
Multiple types of filters may be applied to a query to find studies that have values from all selected filter types. For example, when applying the factor type filter options ‘microgravity’ and ‘age’ the results contain one or both terms. Adding a different type of filter, such as organism ‘microbiota’, will include only data sets containing ‘microbiota’ organisms AND whose factors include ‘microgravity’ or ‘age’.
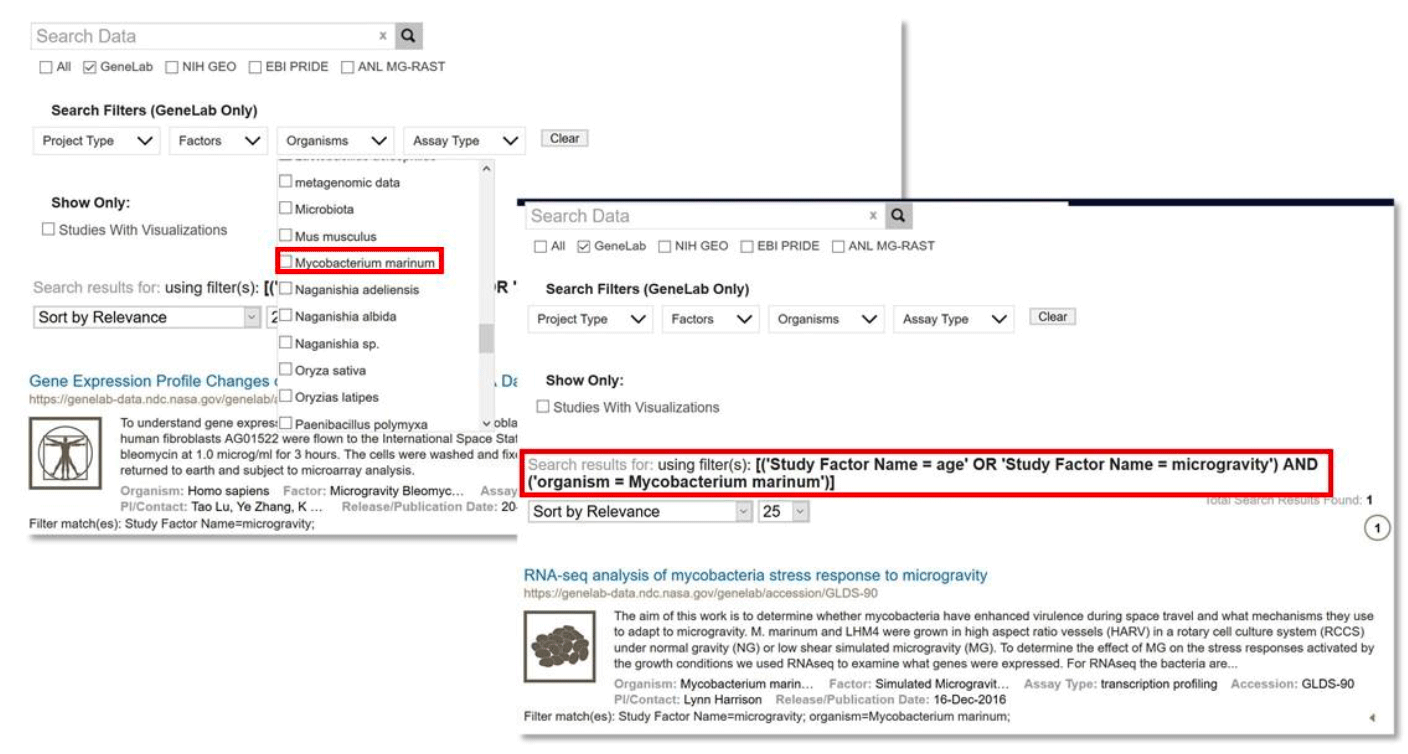
Example: Filter Search by selecting 'Microgravity' or 'Age' under Factors AND ‘Microbiota’ under Organism
Users can change selected filter terms by either selecting the filter again from the drop-down menu or by selecting the ‘Clear’ button. Each selected filter is applied until it is de-selected or all filters are cleared. Note that the ‘Clear’ button only clears the filter terms and does not remove text search term(s) entered above the filters.
Data Integration / Federation for Search Bar
GeneLab has integrated, commonly termed as data federation, with multiple heterogeneous external databases. Users can search across multiple databases in addition to GeneLab. The links in the federated search results are to the authoritative external databases.
GeneLab is currently federated with:
- The National Institutes of Health (NIH) Gene Expression Omnibus (GEO)
- The European Bioinformatics Institute (EBI) Proteomics Identification (PRIDE)
- The Argonne National Laboratory (ANL) Metagenomics Rapid Annotations using Subsystems Technology (MG-RAST)
The GeneLab repository does not contain copies of the data sets found in the external databases but, instead GeneLab maintains metadata records (e.g., information about the data) of the external data sets. These records are automatically updated on a nightly basis to keep the GeneLab database search content up to date with the external databases.
As noted earlier, currently the search filters only work with the GeneLab database.
To search in one or all of these databases, enter text search term(s) and select the desired databases as shown below. To execute the search, press Enter or click the magnifying glass icon. Federated search results are then shown. You may change the database selection(s) at any time and the search results will be updated accordingly.
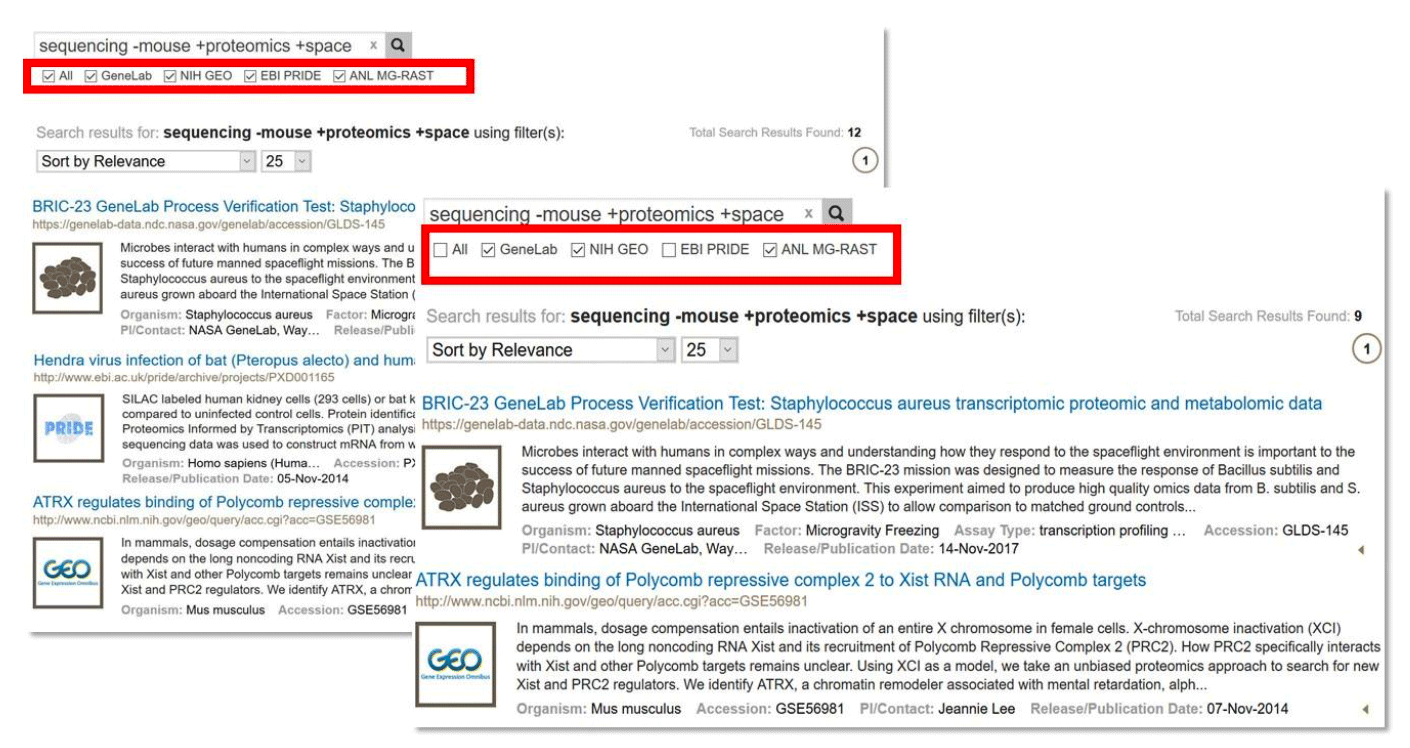
Example: Data federation example, searching across multiple data repositories
GeneLab Data Repository: https://genelab.nasa.gov
Another way to access GeneLab data is to select “Data Repository” on the home page.
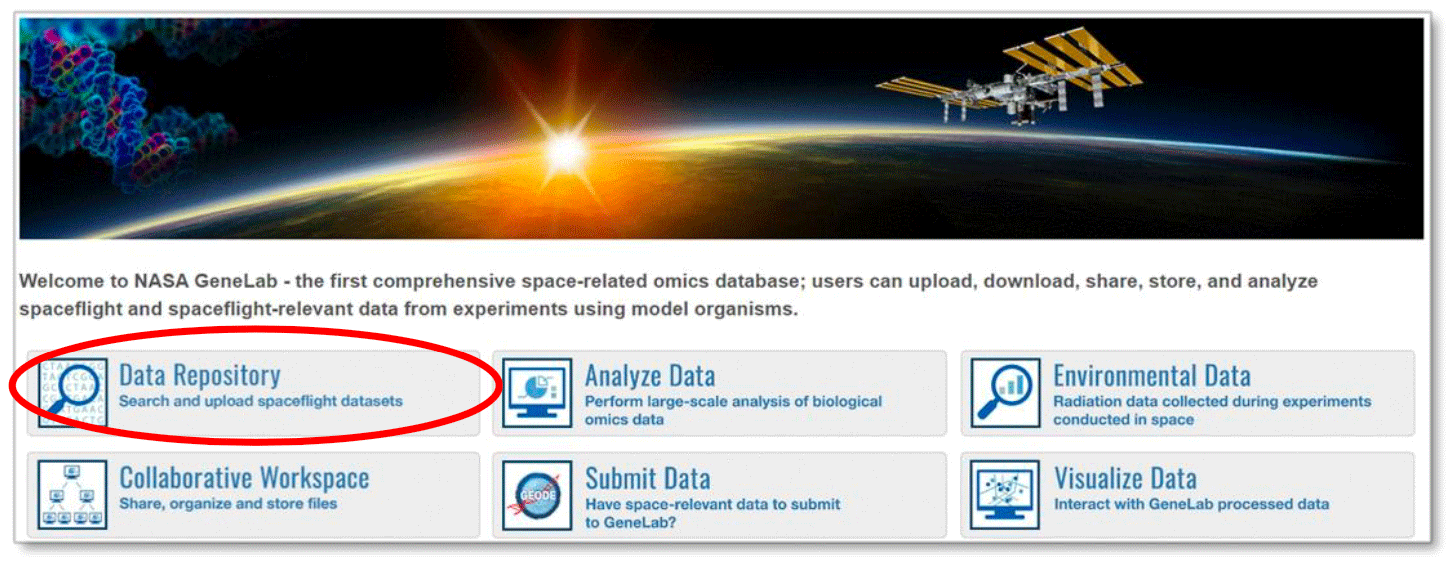
You can then browse the data repository by using the various search techniques discussed above or navigate through the list by scrolling. To select a study, click on the study icon or title, which will direct you to that study’s metadata and data files. An example is shown below.
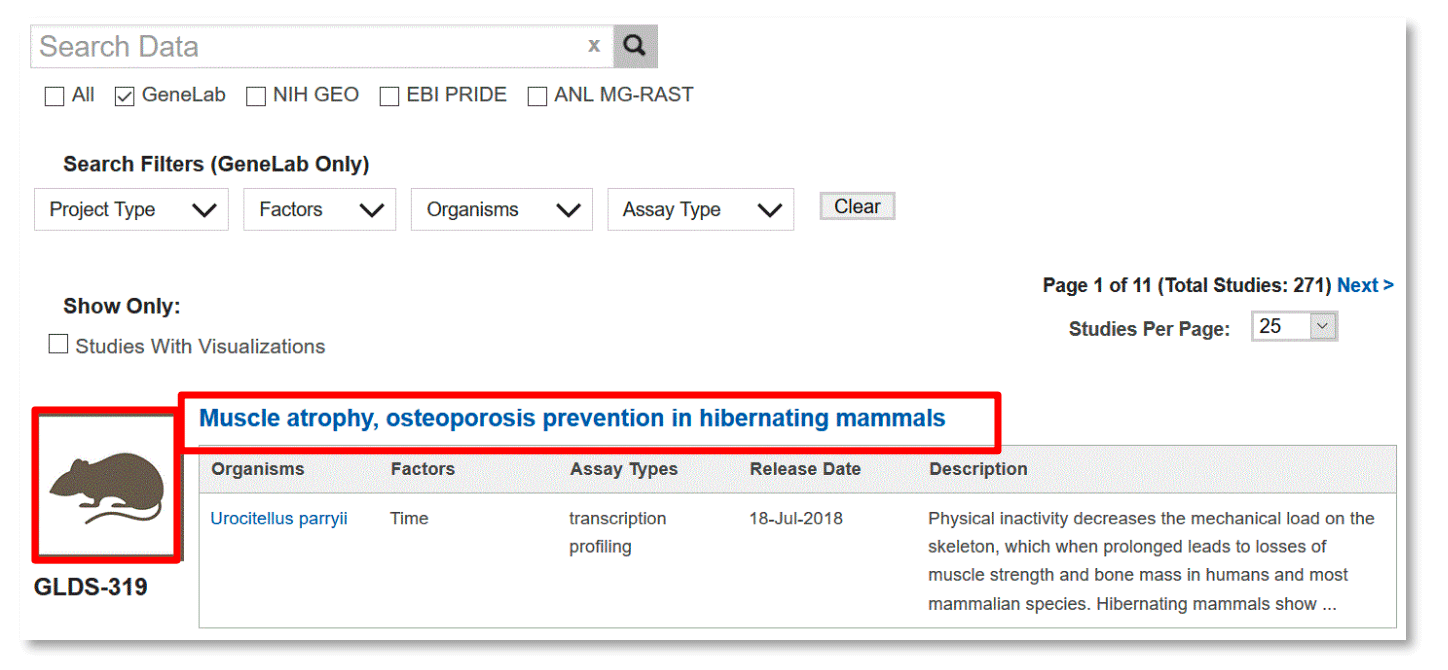
Metadata User Interface
Study metadata are viewable through a tabbed user interface for each study (see below). Click on each tab to navigate through the different sections: Description, Protocols, Sample and Assay Tables, Publications and Study Files.
The Description tab provides an overview of the study including a text description, contact information, experimental factors, organism(s), type of assay(s), project and/or mission details, funding information and citation information.
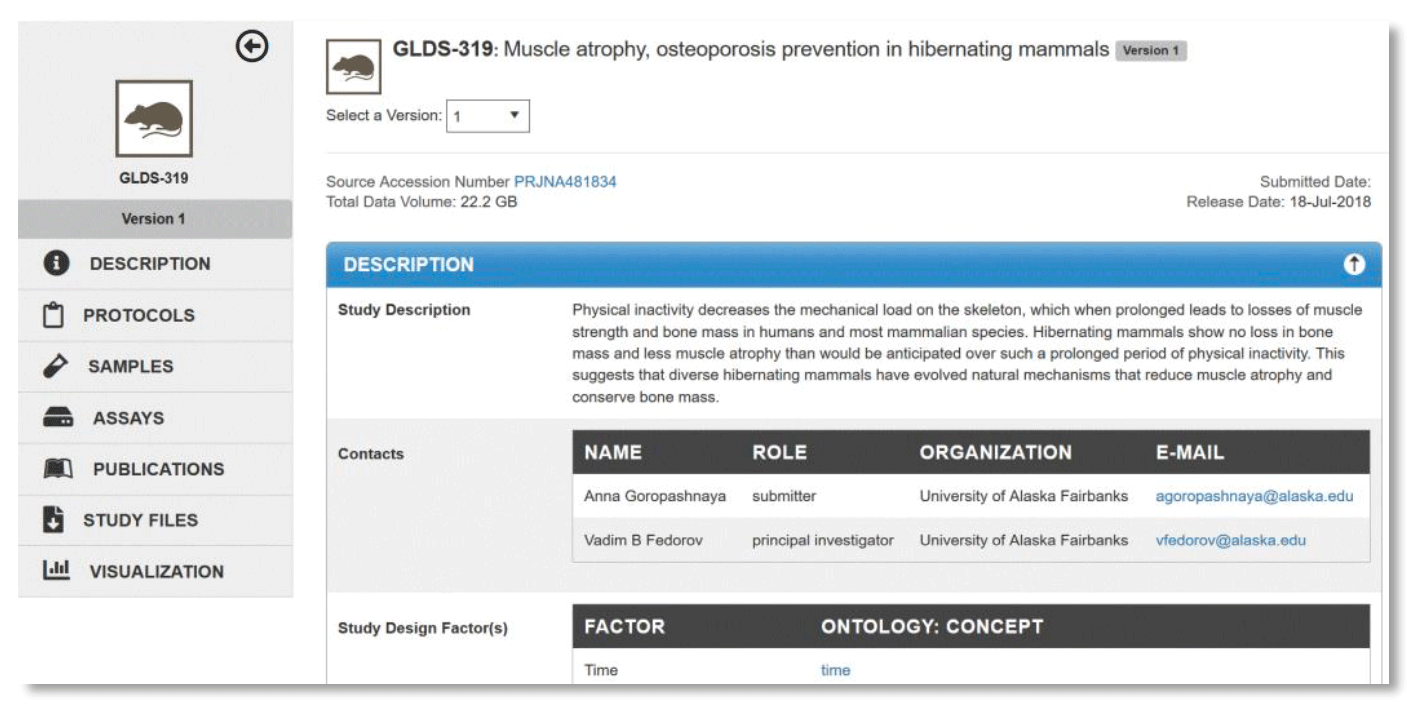
Example: Description view for GeneLab dataset, GLDS-319.
The Protocols tab provides the names and detailed descriptions of the sample collection, library construction, assay, treatment and any other protocol(s).
The Samples and Assays tabs provides sample and assay level details formatted in a navigatable table. Information found in these tabs include specific organism characteristics, study factors and treatments, sample and sample processing metadata, assay execution paramenters, and data processing metadata. Use the bottom navigation bar to scroll through all the columns, and the right margin scroll bar to navigate the rows.
Filtering
Click the ![]() button to sort or filter the values in one or more columns. Use Sort Ascending or Sort Descending to sort the values in the column. Click on Columns to hide (uncheck) or show (check) columns within that table; by default all columns are shown. To filter values for one or more columns, use the options under Filter and enter the desired value(s) or value ranges. See example below.
button to sort or filter the values in one or more columns. Use Sort Ascending or Sort Descending to sort the values in the column. Click on Columns to hide (uncheck) or show (check) columns within that table; by default all columns are shown. To filter values for one or more columns, use the options under Filter and enter the desired value(s) or value ranges. See example below.

Example: A GeneLab dataset, GLDS-319, sample name tab and sort/filter functions.
Exporting tables to csv
Users can download selected columns from the Samples and/or Assays table. Click on the Select Export Columns button. Select the desired columns and click Export CSV.

The Publications tab contains relevant publication(s), which contain the metadata of interest, and also include title, authors and link(s).
The Study Files tab provides metadata, raw and/or processed study data files. Each row includes information about the size, type, and description of the file set. Click on the file name to download. You can download multiple files by clicking the checkbox at the left of the file name to select and then clicking the “Download Selected Files” button. To select all files in a resource category, navigate to the desired folder by selecting the folder name and then click on the checkbox at the top of the table, next to the Files column name.
Use the ![]() button to sort or to filter the values in one or more columns.
button to sort or to filter the values in one or more columns.
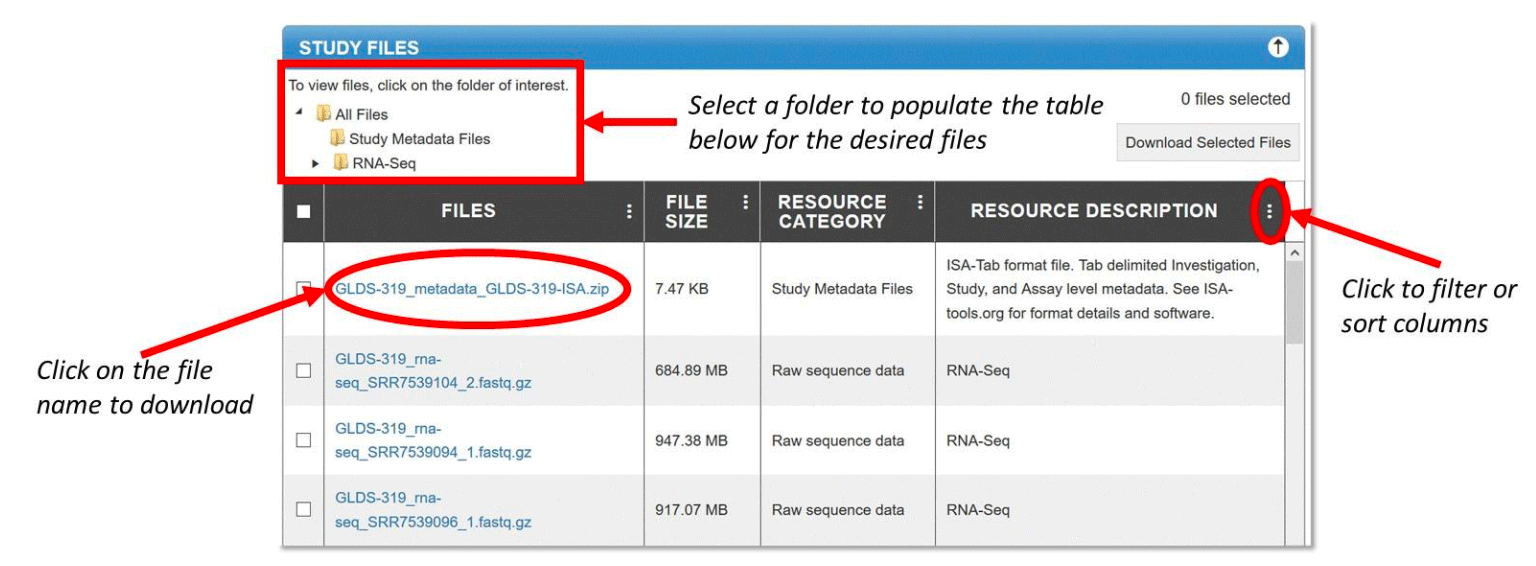
Example: Study files view and sort/filter functions for GeneLab dataset, GLDS-319.
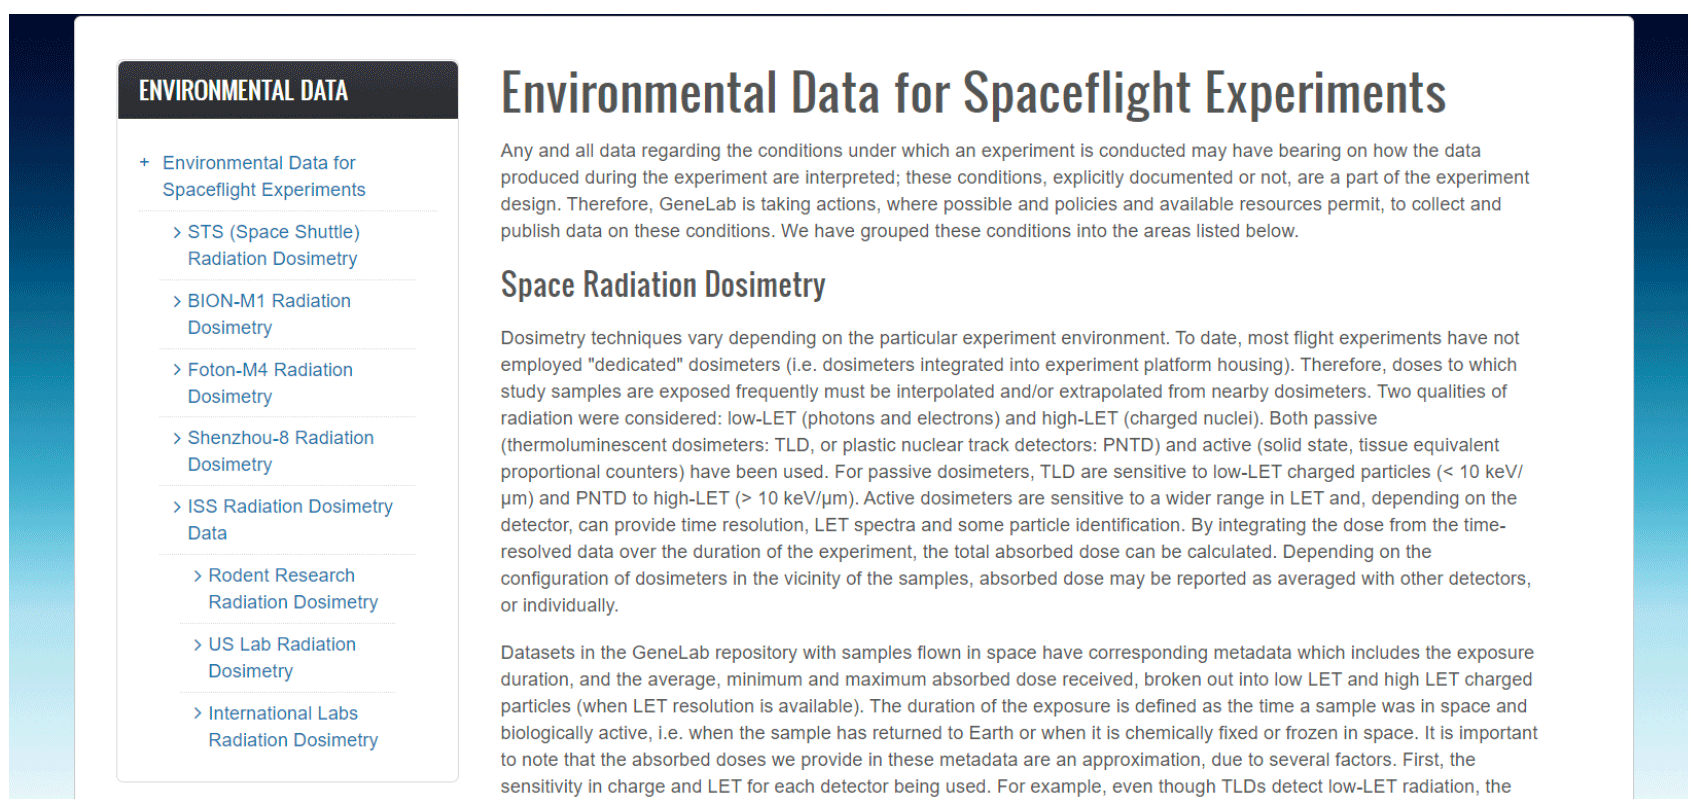
Environmental Data
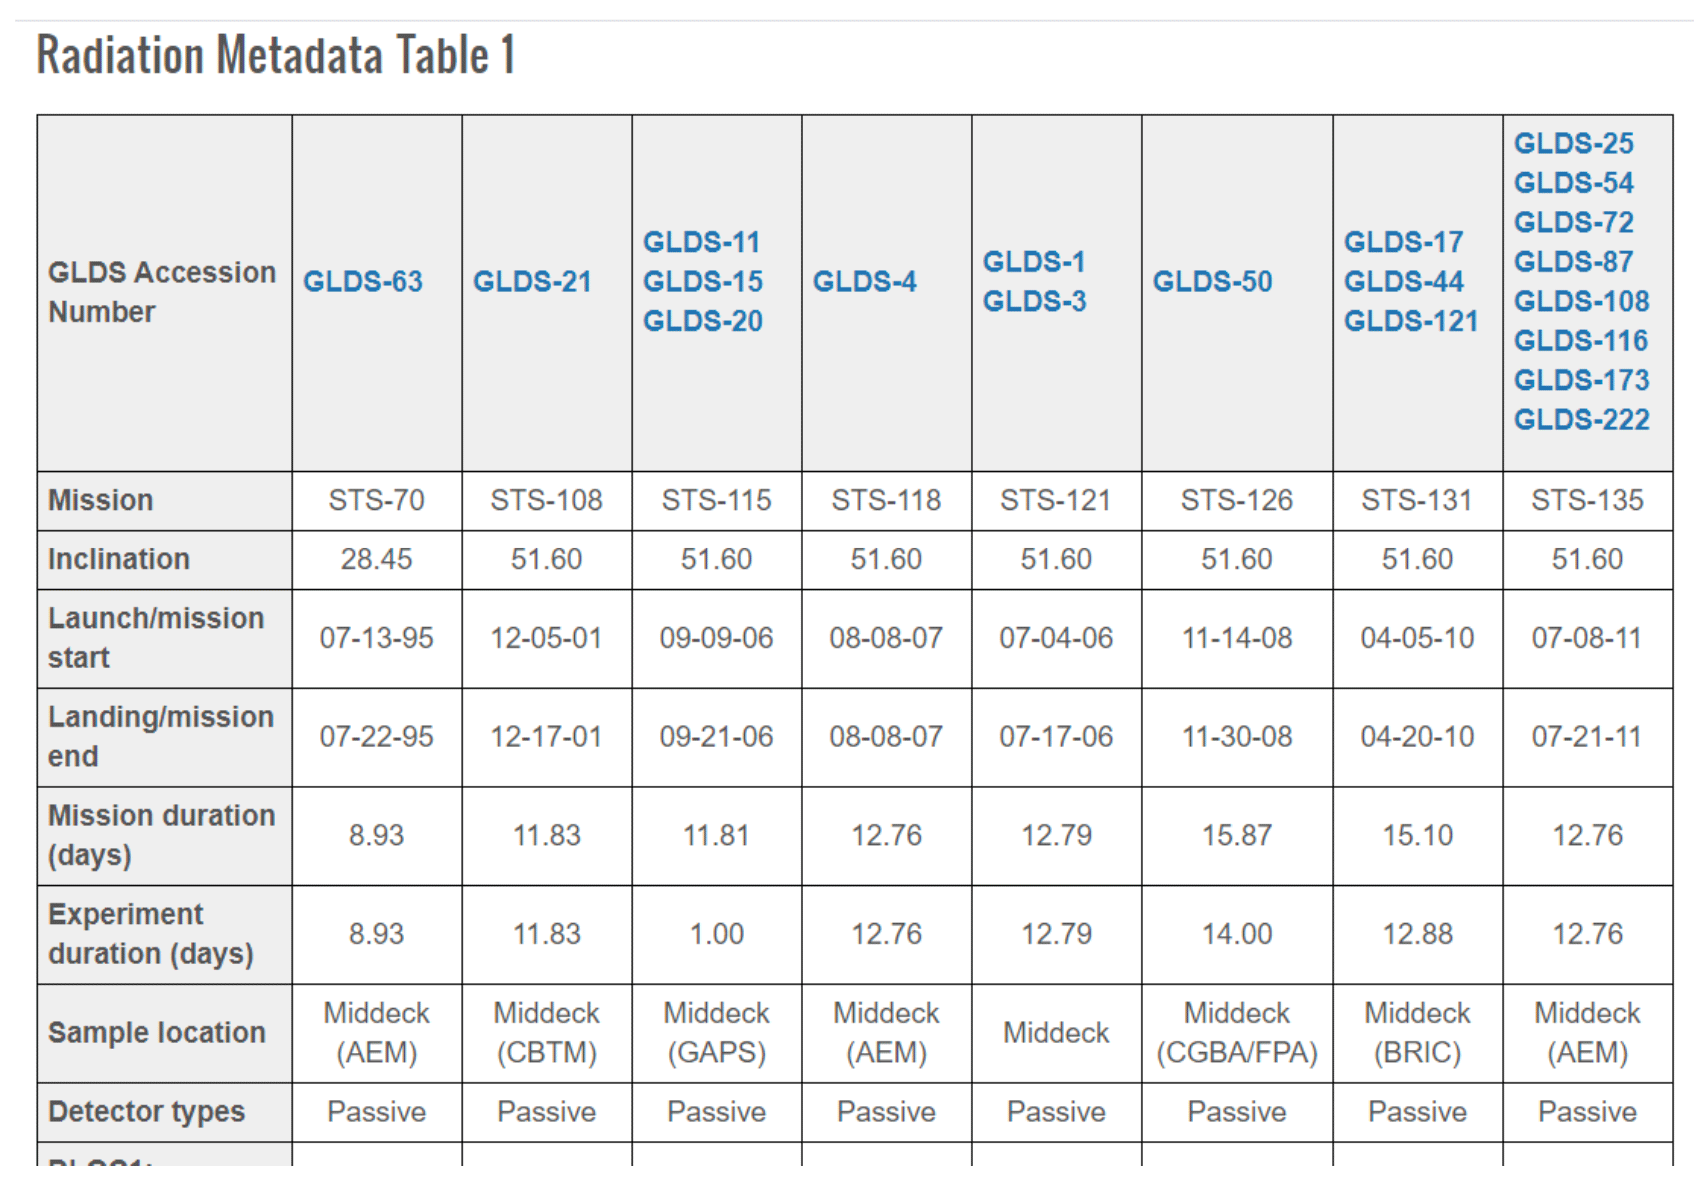
GeneLab has incorporated additional data to support spaceflight experiments. These data include environmental data from the spacecraft or payloads (hardware). Currently, GeneLab has gathered radiation dosimetry data from spaceflight experiments and provides a complete table for several spacecrafts under the ‘Environmental Data’ menu option.
Select an option from the left menu to display the environmental data available for GeneLab studies from that spacecraft dosimetry. For example, below is the table from STS (Space Shuttle Radiation Dosimetry).
In addition, users can find radiation dosimetry details per sample within the sample table for available space flown GeneLab study. To access this data, click on the desired GLDS number on the table and navigate to the Samples tab.
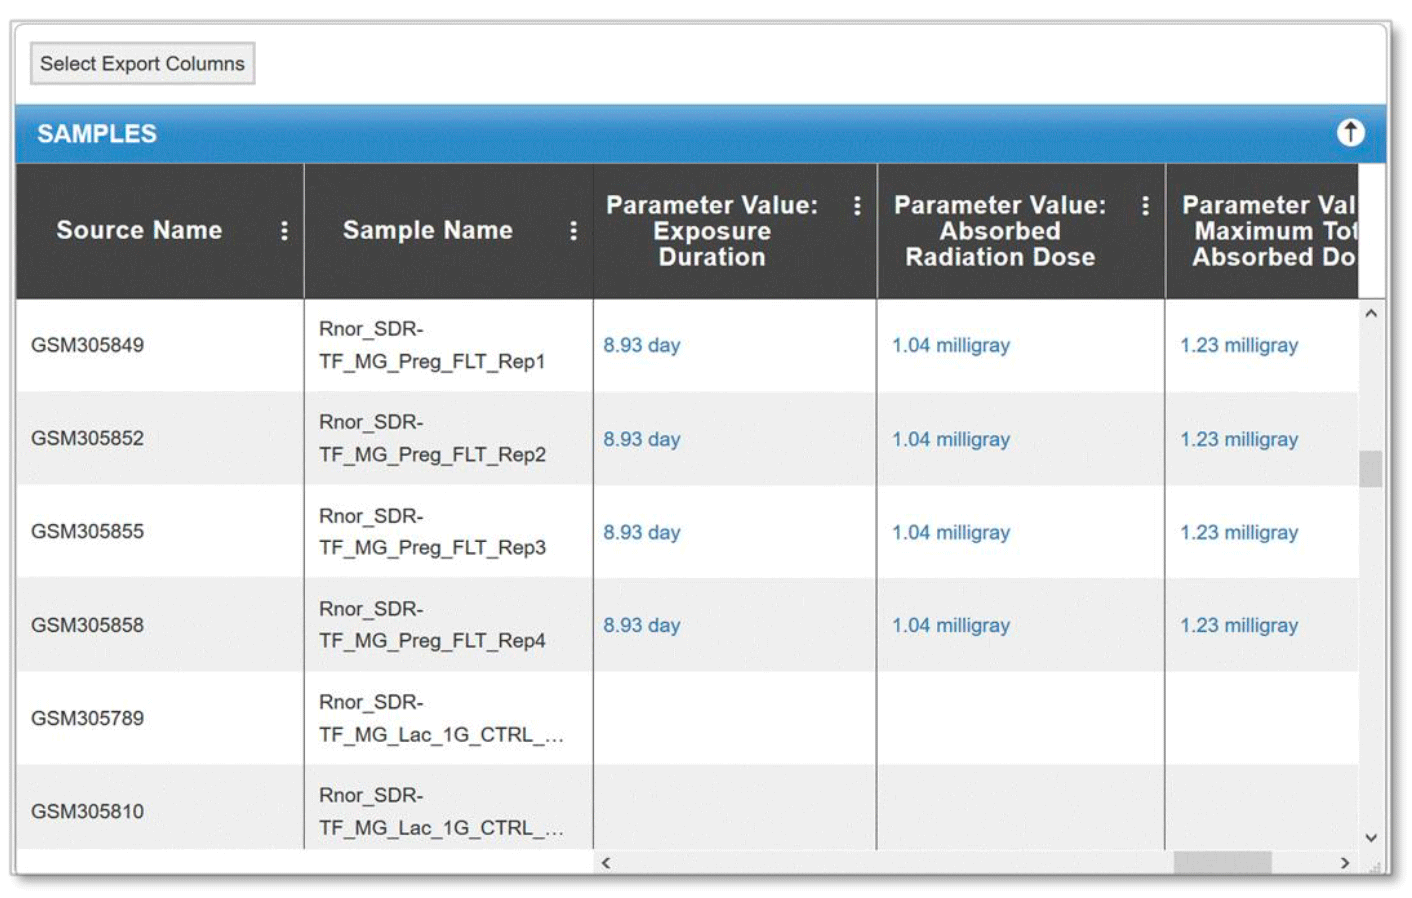
Example: Radiation metadata for GeneLab dataset GLDS-63 through the samples tab.
Data Visualization
The Data Visualization tab provides a list of GeneLab datasets studies that contain visualizations.
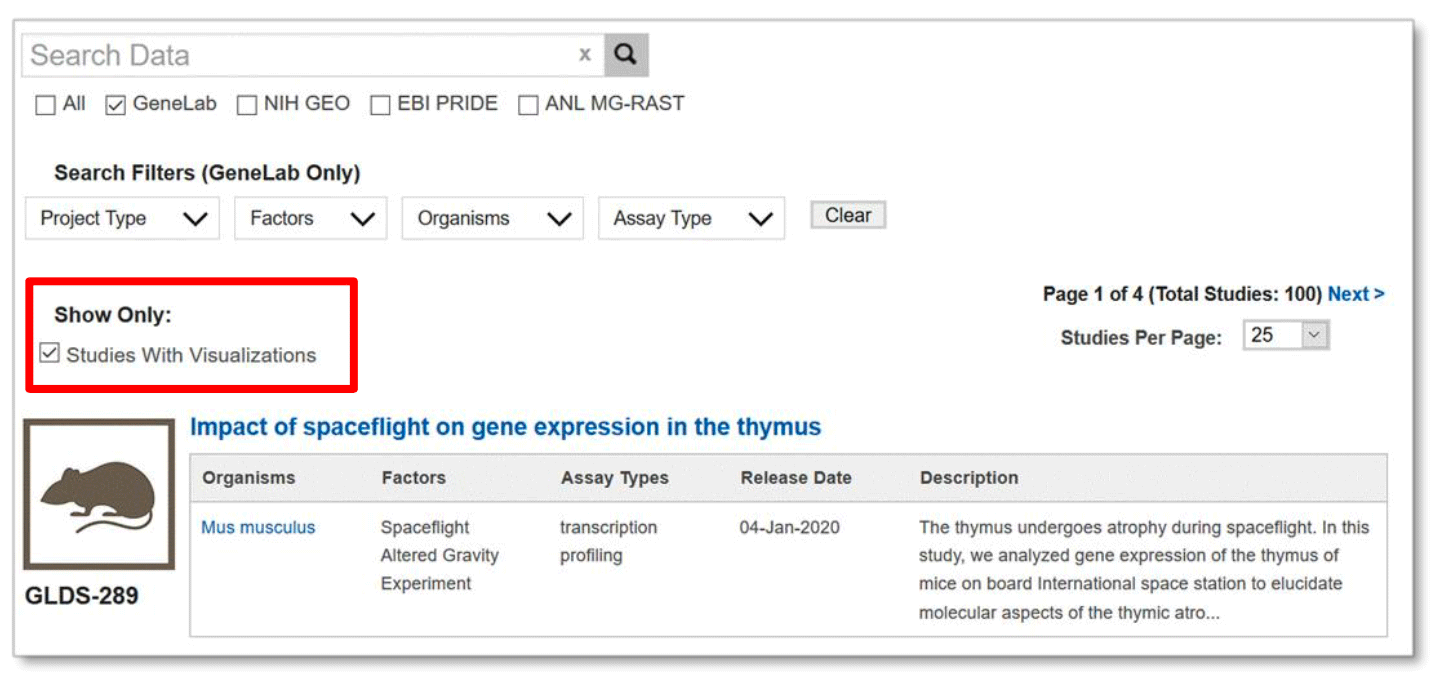
Example: All studies with visualizations shown after clicking on the data visualization tab from the homepage.
To navigate to the visualization menu, select the study and click on the visualization tab on the left menu.

Example: Results after selecting the GLDS-289 number followed by the visualization tab.
Visualization menu – click on any of the options to navigate through the different tabs.
PCA: Principal component analysis shows clusters of samples based on their similarity. Click on samples to the right to select the desired samples to be viewed on the PCA plot. Icons on the upper right region of the plot allow for downloading, navigating and saving the plot.
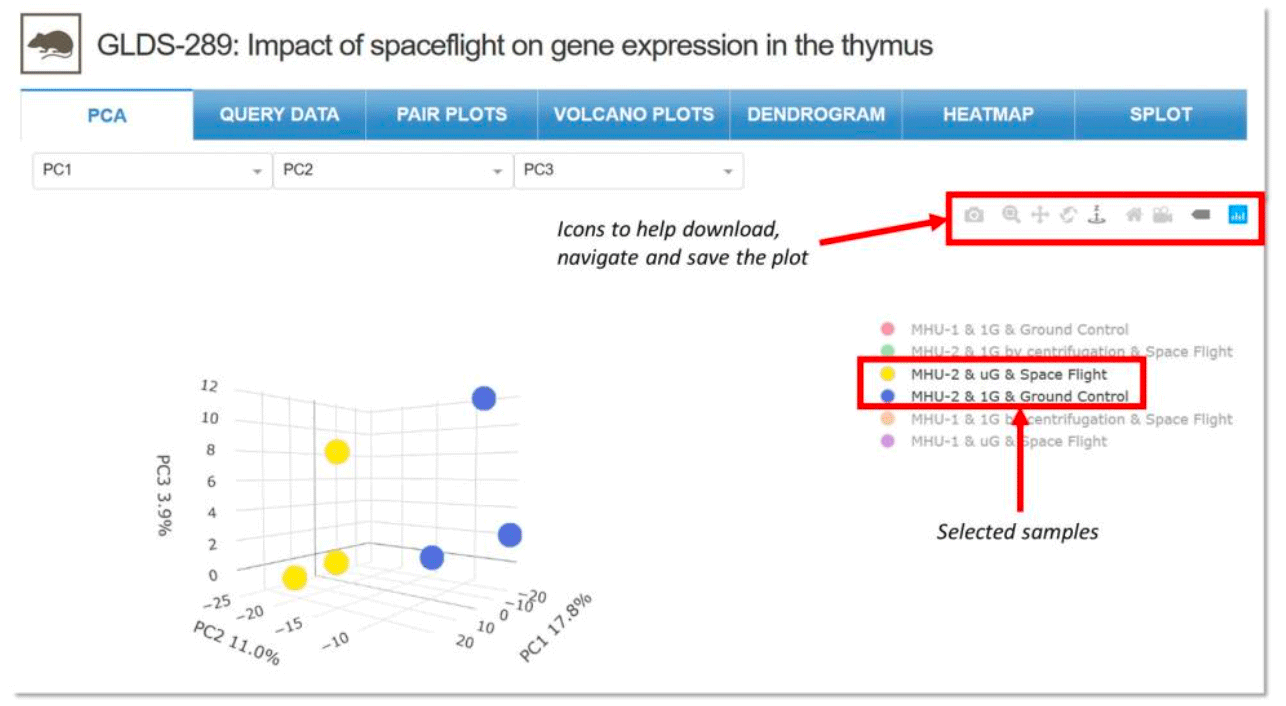
Example: Two of six samples selected for viewing in the PCA plot with navigation icons on the upper right for GLDS-289.
Query Data: Provides the normalized gene expression values for microarray datasets and normalized count values for RNA-seq datasets for each sample in the dataset. Drop down menus allow for gene and comparison type selection along with sorting of results, selection of the maximum adjusted p-value and number of genes.
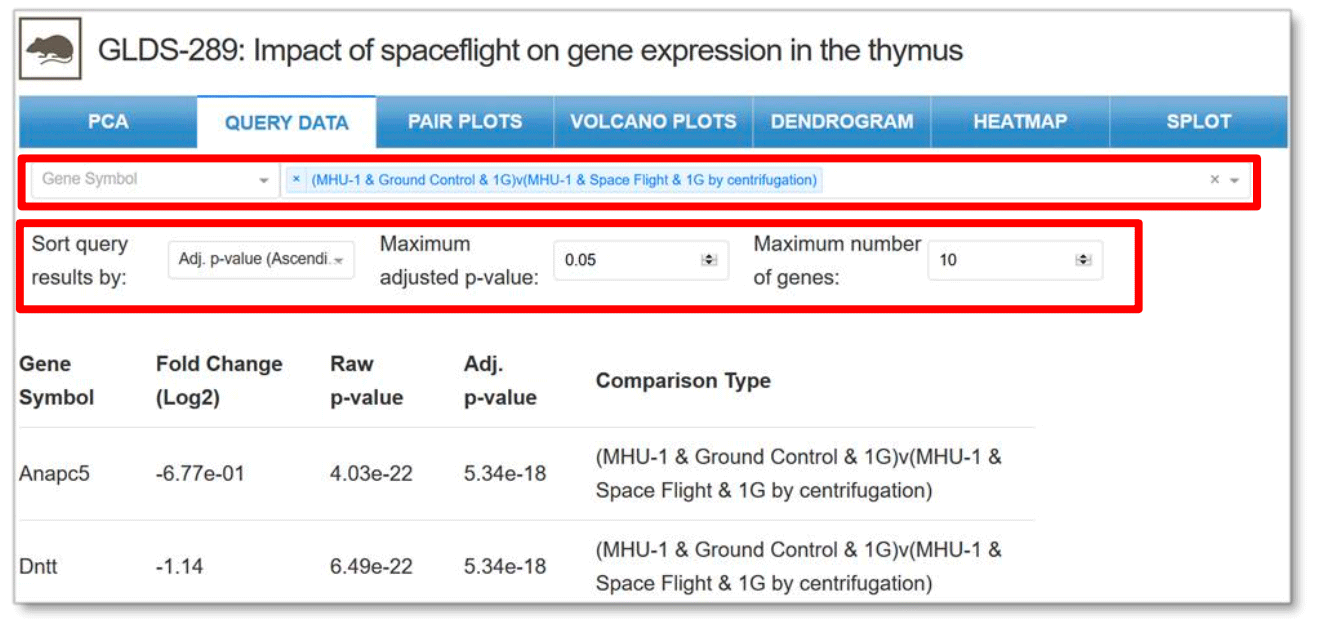
Example: Comparison between two samples with specific adjust p-value and maximum number of genes for GLDS-289.
Pair Plots: Allows for the visualization of both distribution of single variables and relationships between two variables. Drop-down menu allows for comparisons between any two samples.
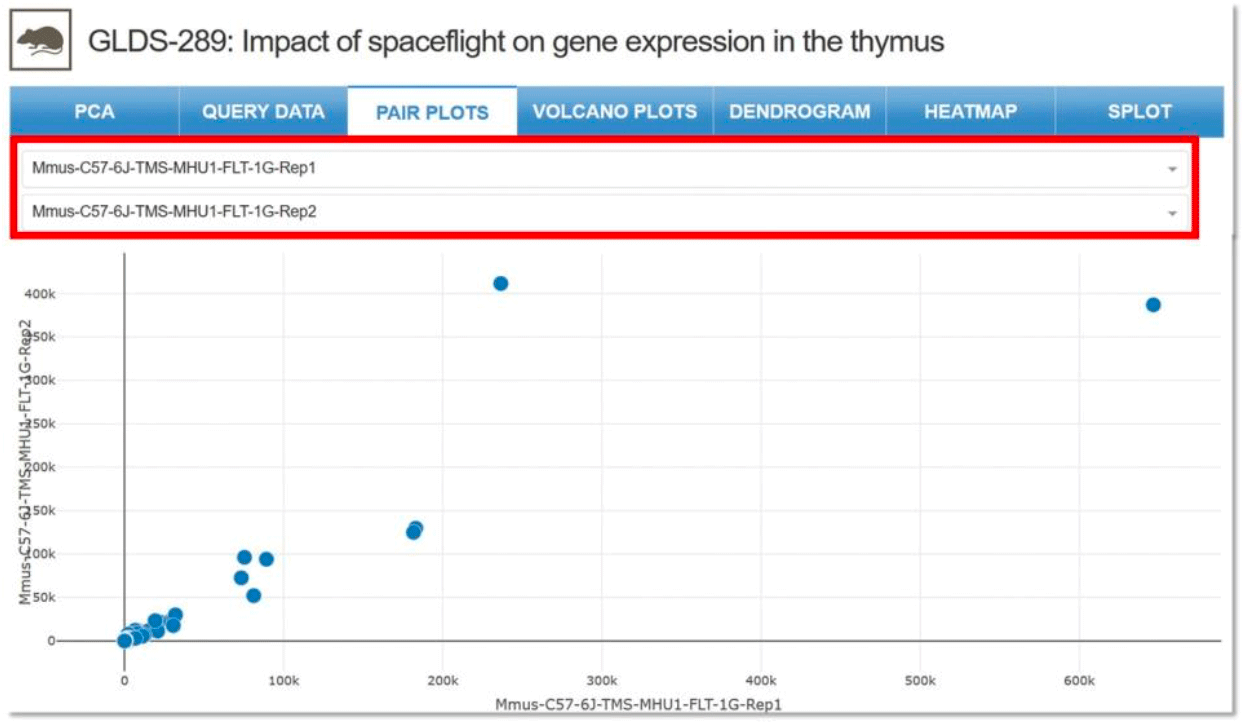
Example: Comparison between a ground control sample and a flight sample for GLDS-289.
Volcano Plots: Type of scatter plot that shows statistical significance (p-value) vs magnitude of change (fold change). Enables quick identification of genes with large fold changes that are also statistically significant. Drop-down menu allows for selection of parameters, samples for comparison and maximum adjusted p-value.
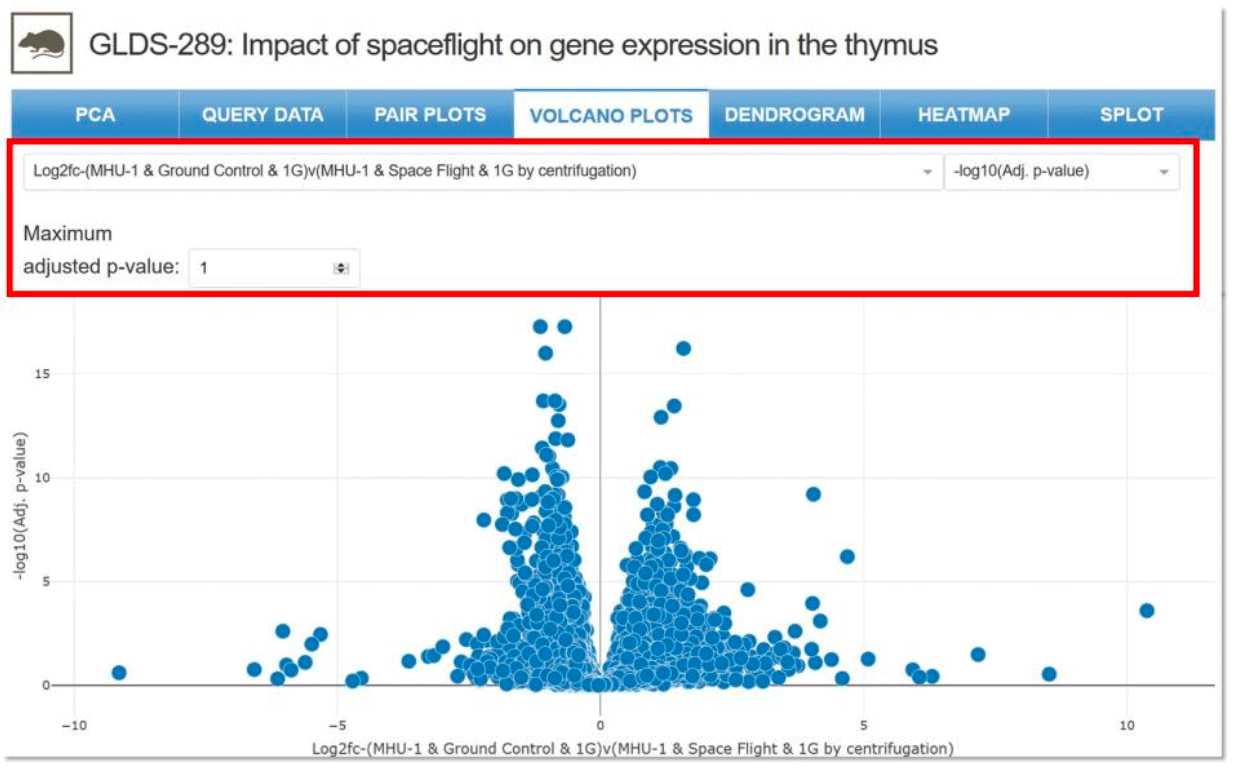
Example: Two samples selected for comparison with specific parameters for GLDS-289.
Dendrogram: A tree diagram showing how the individual genes and samples will cluster together. Drop-down menus allow for the selection of specific parameters, samples for comparison, maximum p-value and maximum number of genes.
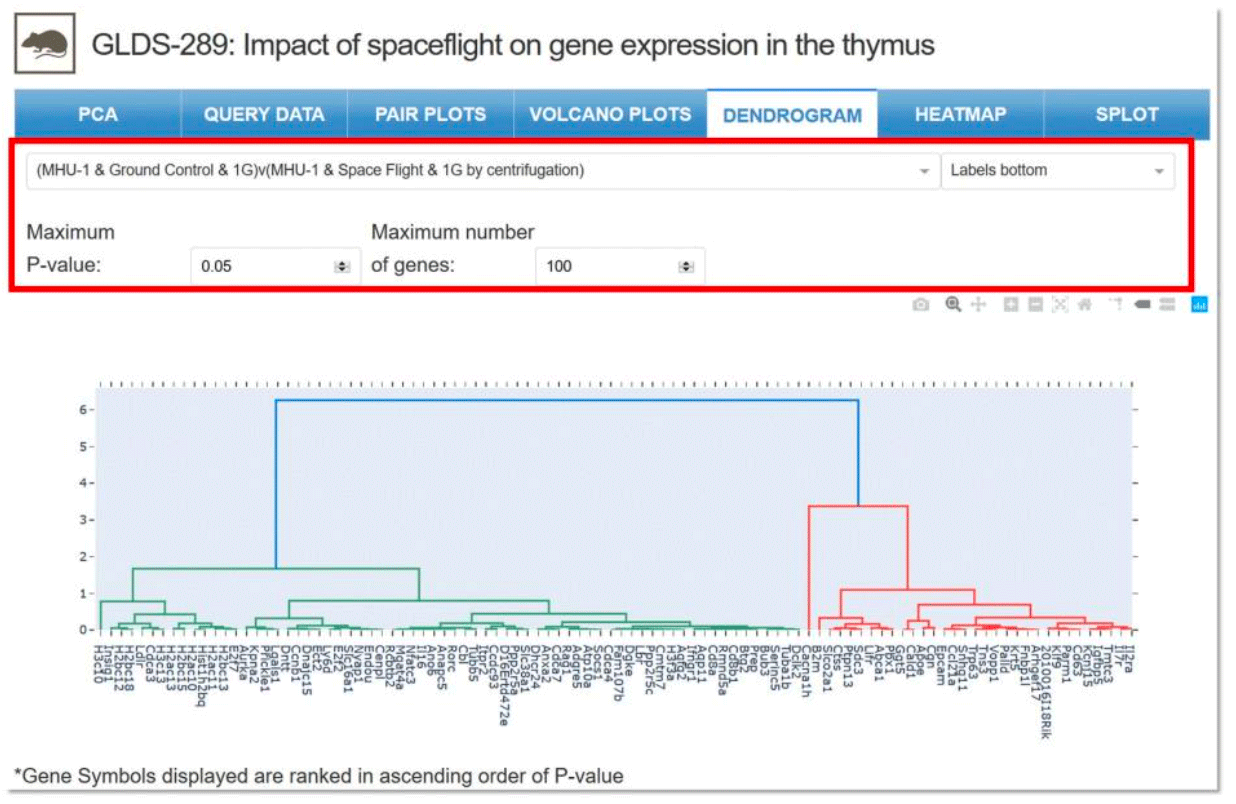
Example: Two samples selected for comparison with specific parameters for GLDS-289.
Heatmap: Graphical representation of the individual samples displaying how the overall genes are up and down regulated across all samples in the dataset. Clustering of both the genes and the samples are also displayed. Drop-down menu allows for the selection of samples for comparison and the maximum number of genes displayed.

Example: Two samples selected for comparison for GLDS-253.
Splot: Allows a user to determine how the genes in each dataset are impacting overall pathways. This interactive plot allows a user to adjust both significance and fold-change values to show which pathways are potentially being impacted for the dataset. Drop down menu allows for the selection of a specific pathway, while the sliders allow for selection of fold-change and p-value.
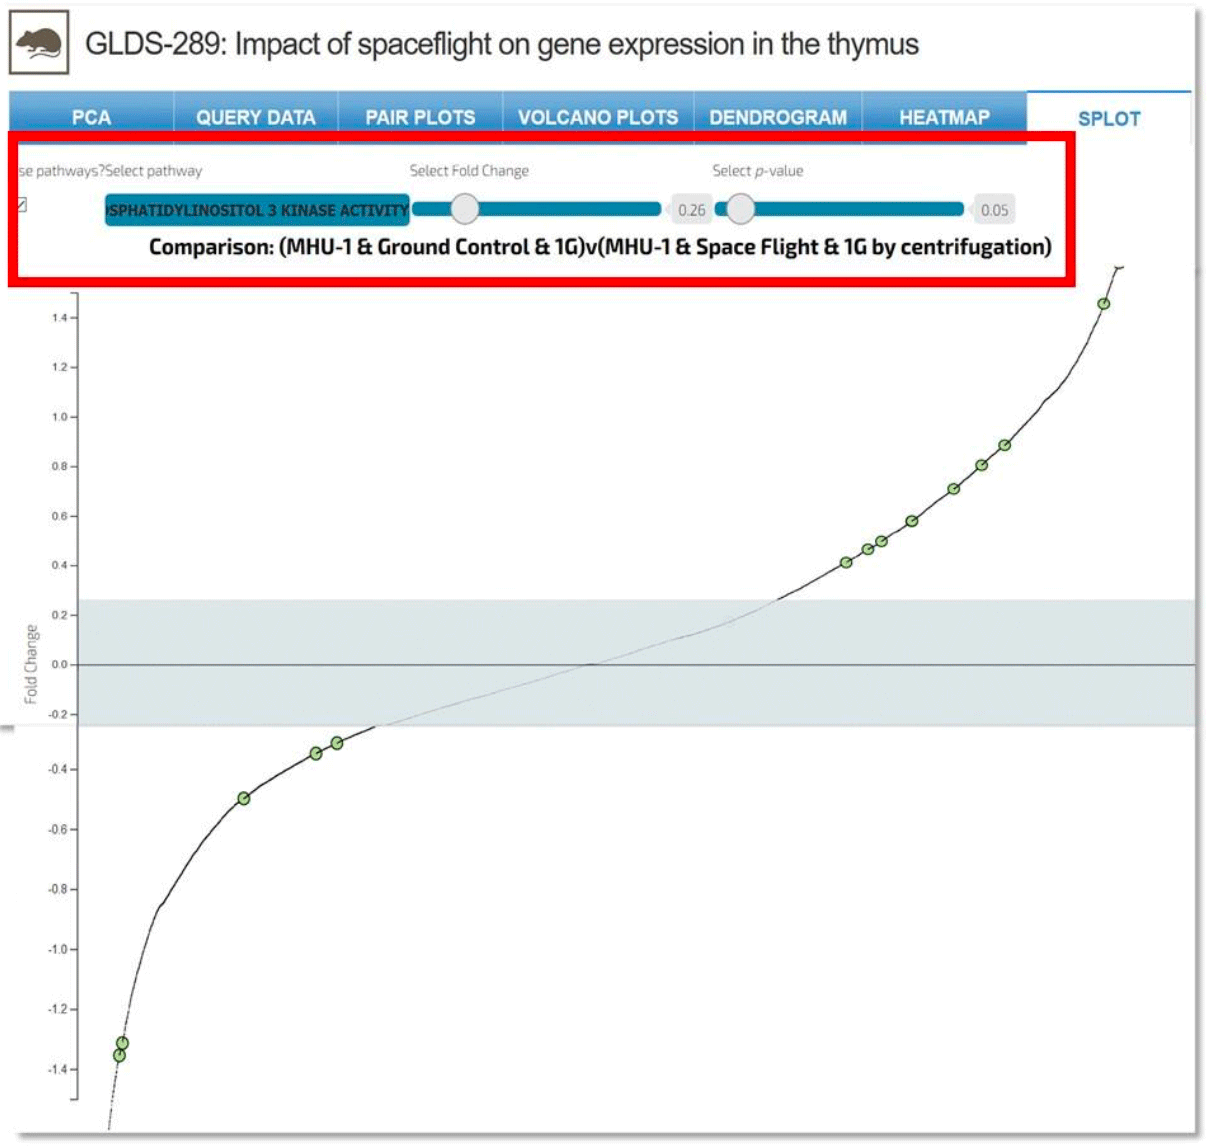
Example: Comparison of 1-phosphotidylinositol 3-kinase activity between two samples within GLDS-289.
User Account
The GeneLab Data System provides various tools: Collaborative Workspace and GeneLab Environment for Online Data Entry (GEODE). To access these tools, users must create an account using a Google login or NASA credentials. Once created, this account information is shared across all the tools.
Setting up a User Account
To create a NASA Collaborative Workspace and/or GEODE user account, click on the tool button on the home page or under Data & Tools in the top menu.

For example, click on Collaborative Workspace to create an account and login.
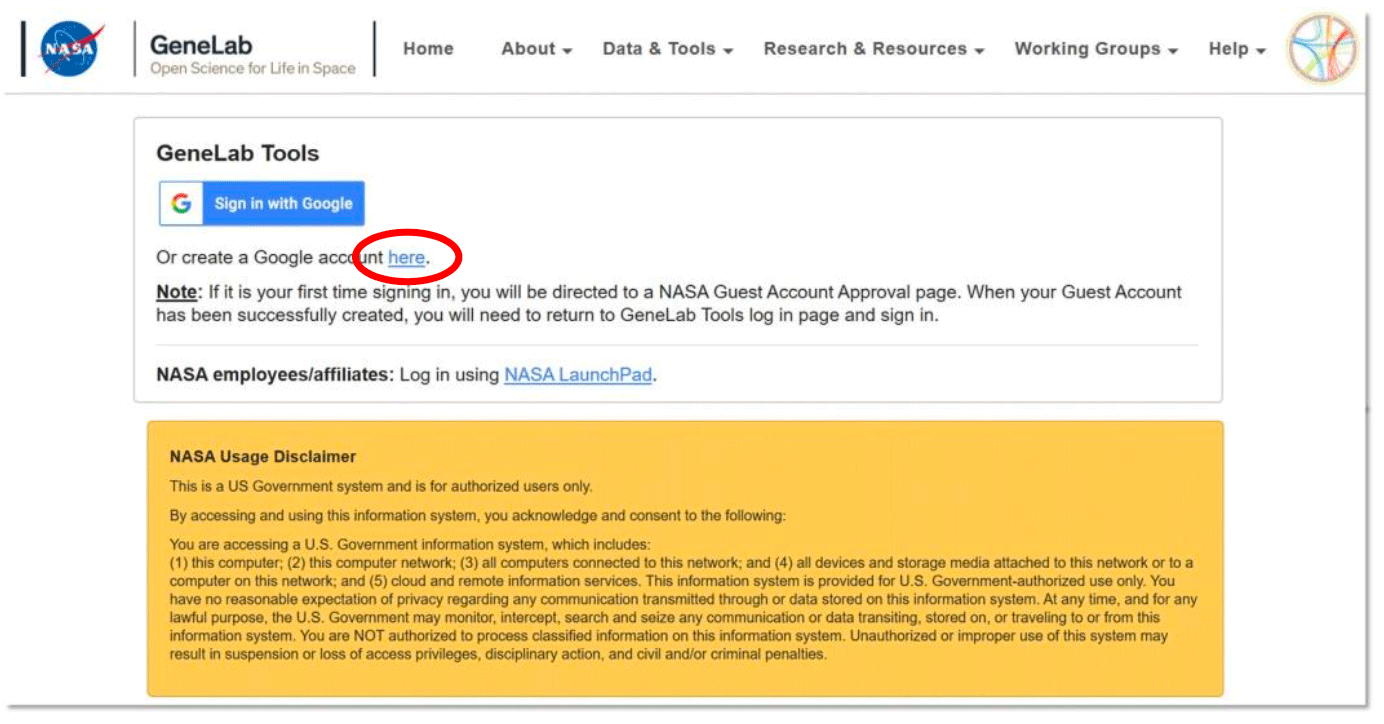
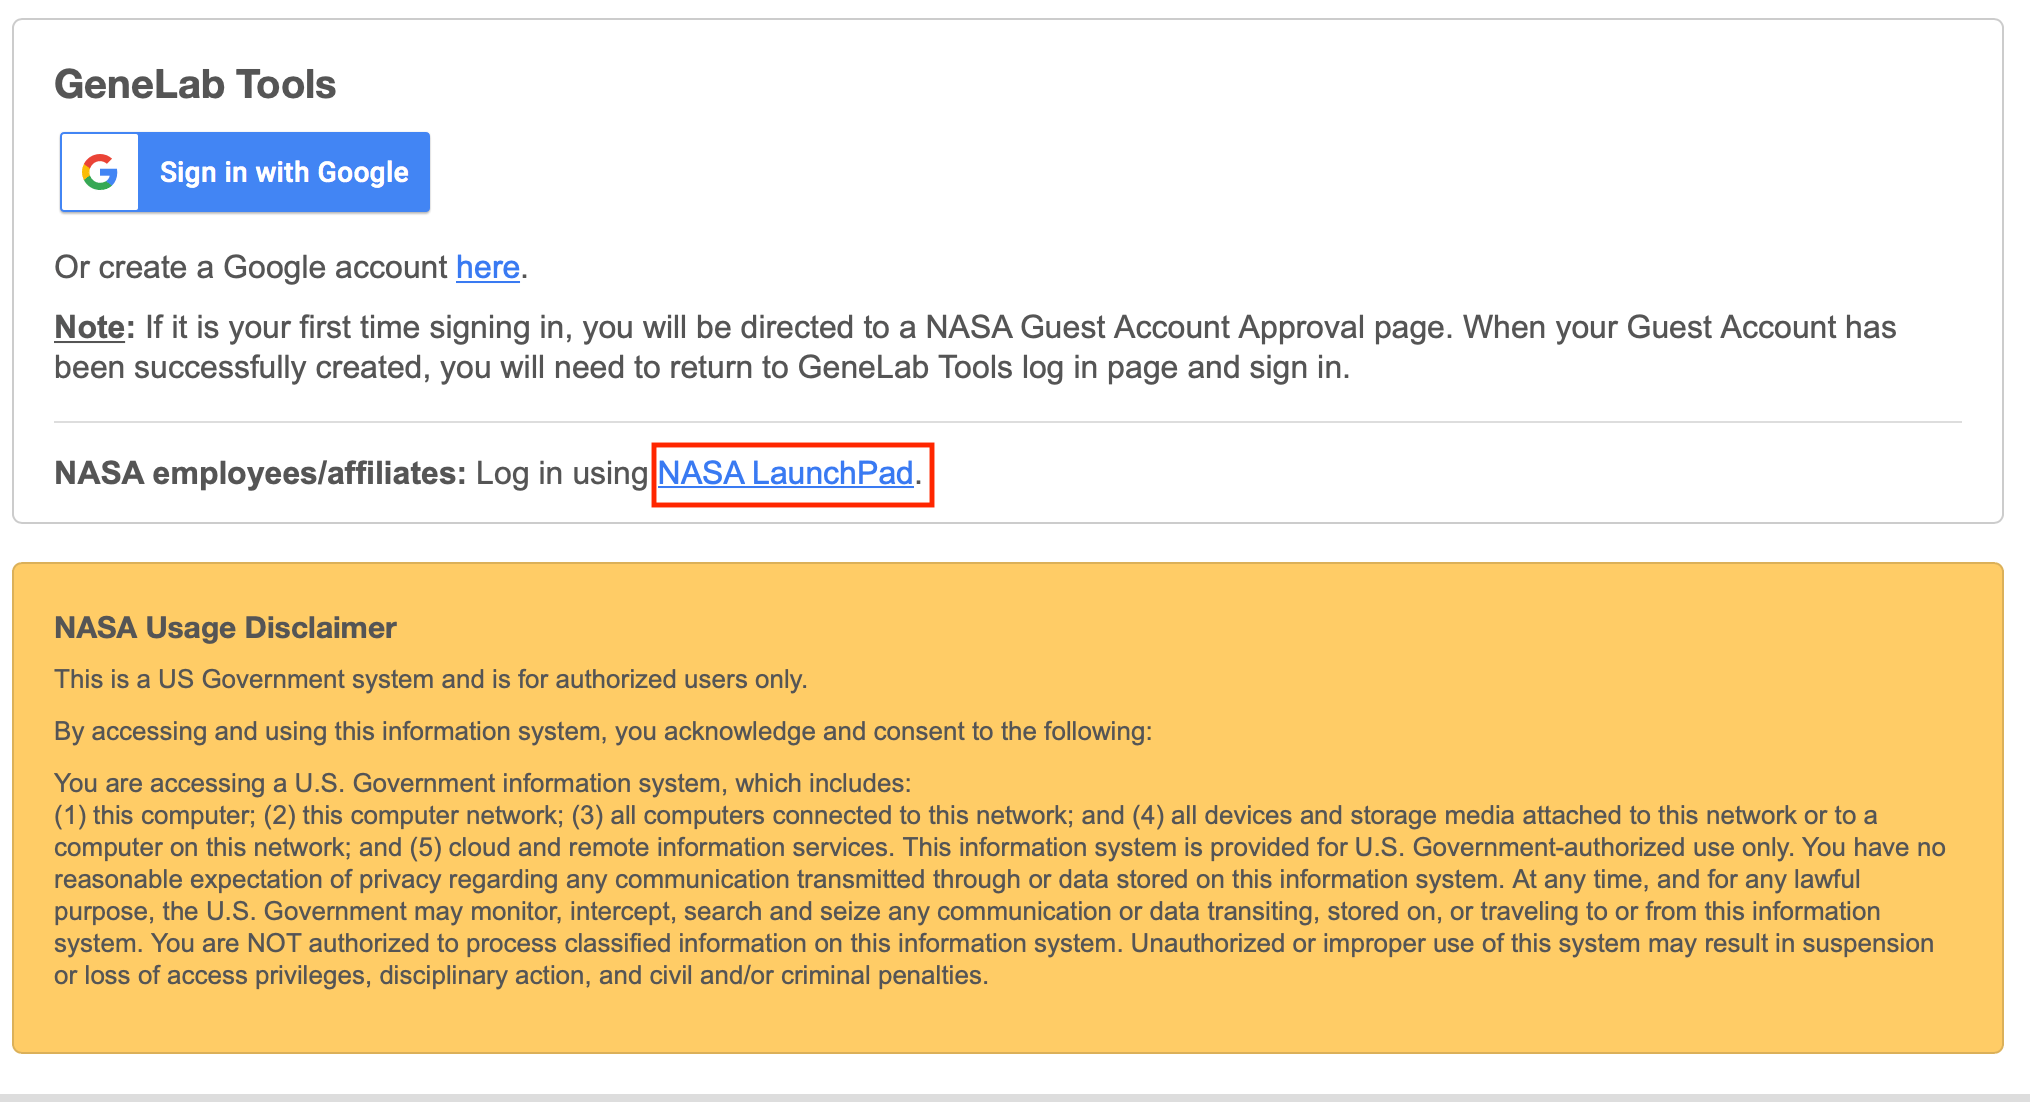
- On the login page (shown below), use the Sign in with Google or NASA LaunchPad button to login.
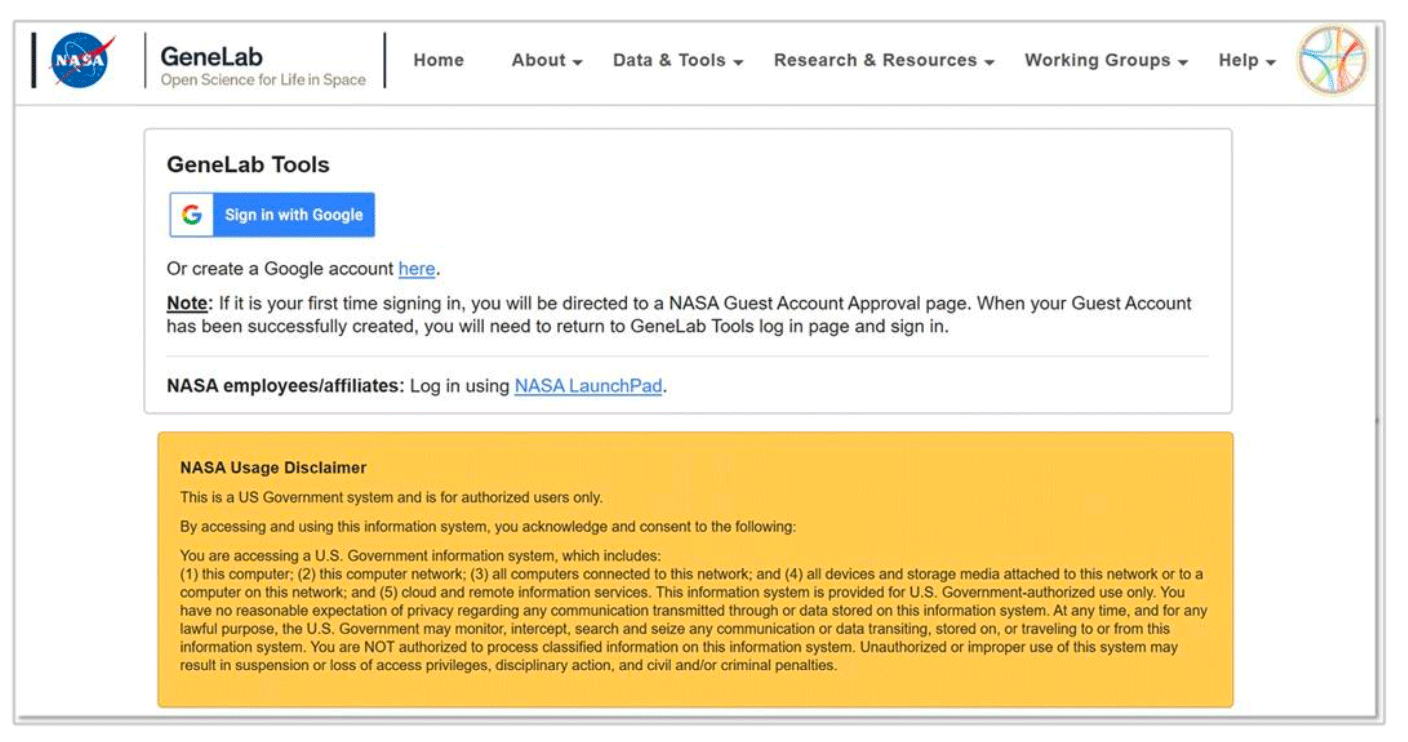
- For Google login, if you don’t already have an account, create an account by selecting the “here” link circled in the image below and following the steps.
-
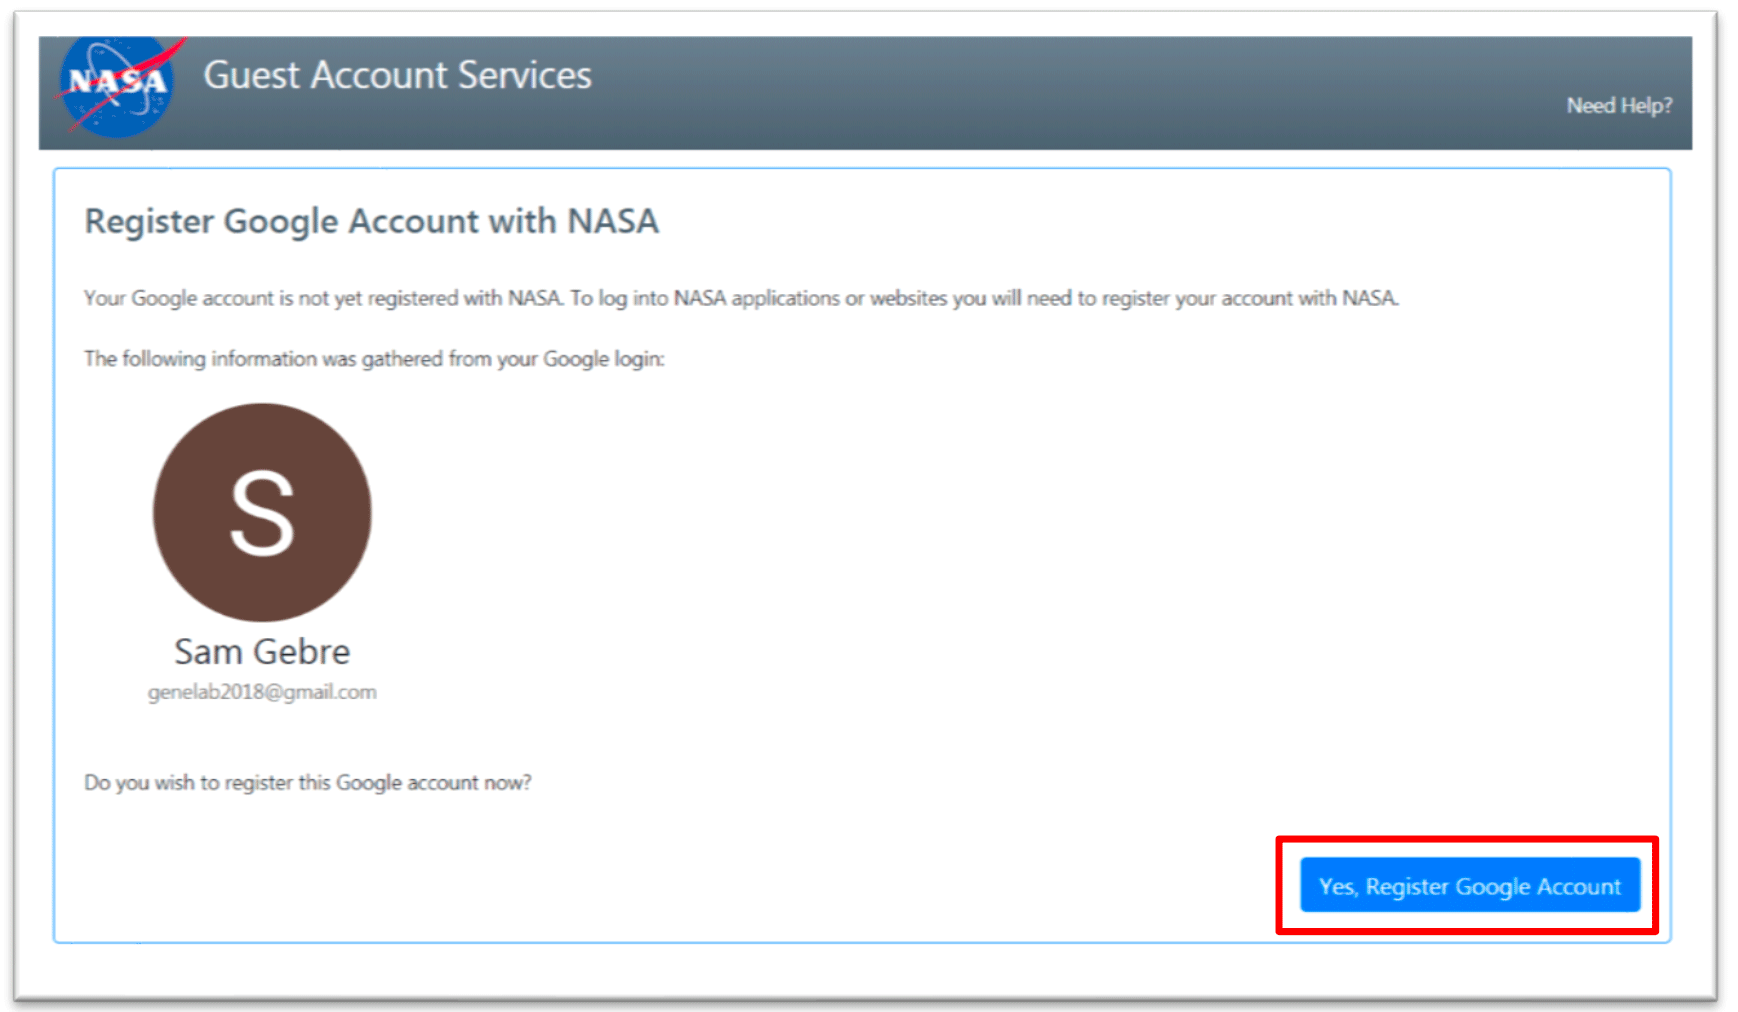
Once you have a Google ID, select the Sign in with Google button and use your google account to login (example below).

- A NASA Guest Account Registration page opens up. Click, Yes Register Google Account to continue.
- You have now successfully registered your Google account with NASA.
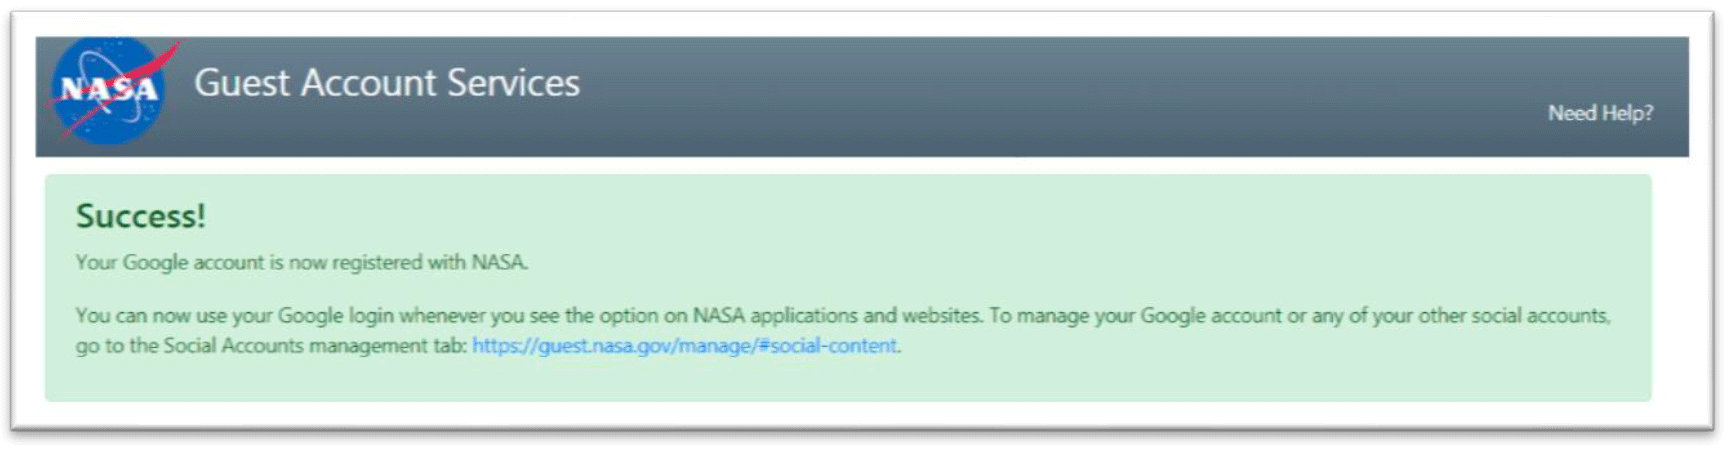
- Navigate back to the Collaborative Workspace (https://genelab-data.ndc.nasa.gov/genomespace-sso- login/) login page.
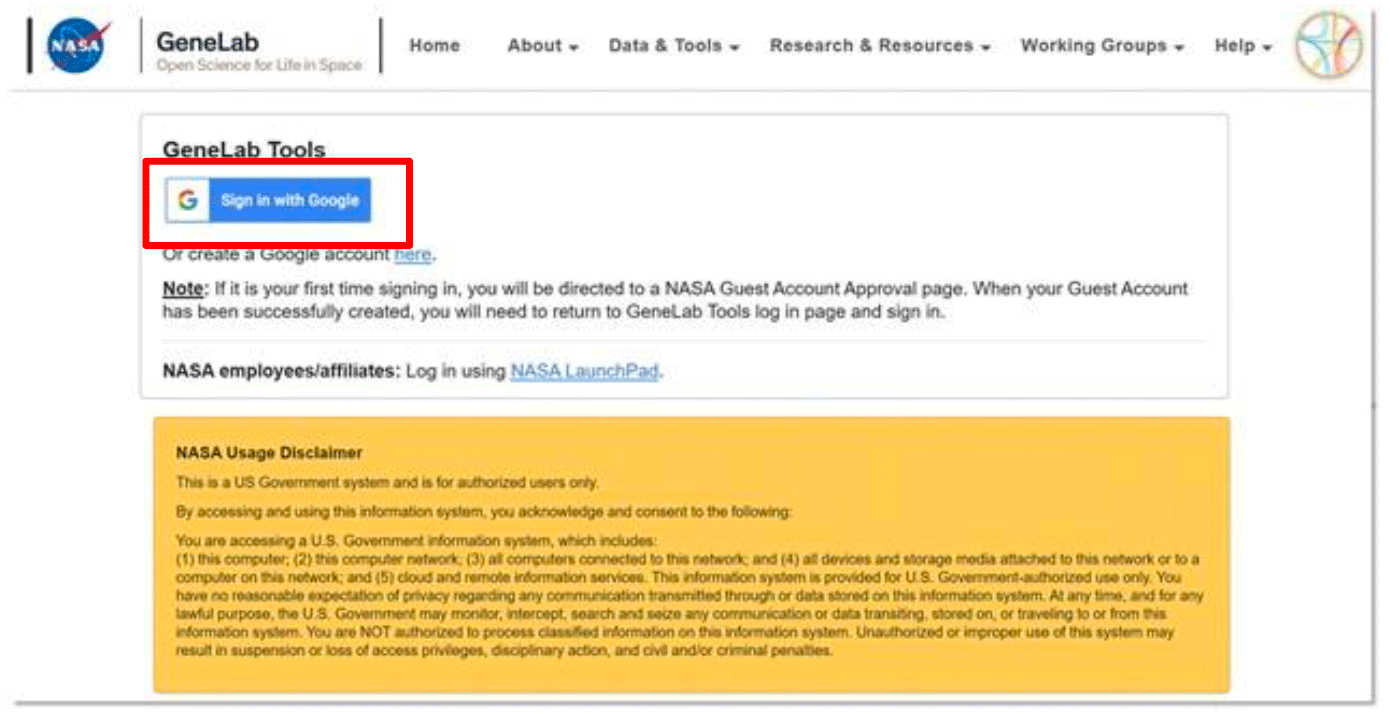
- Click on the Sign in with Google button. Select the registered Google account and it will direct you to the GeneLab tool.
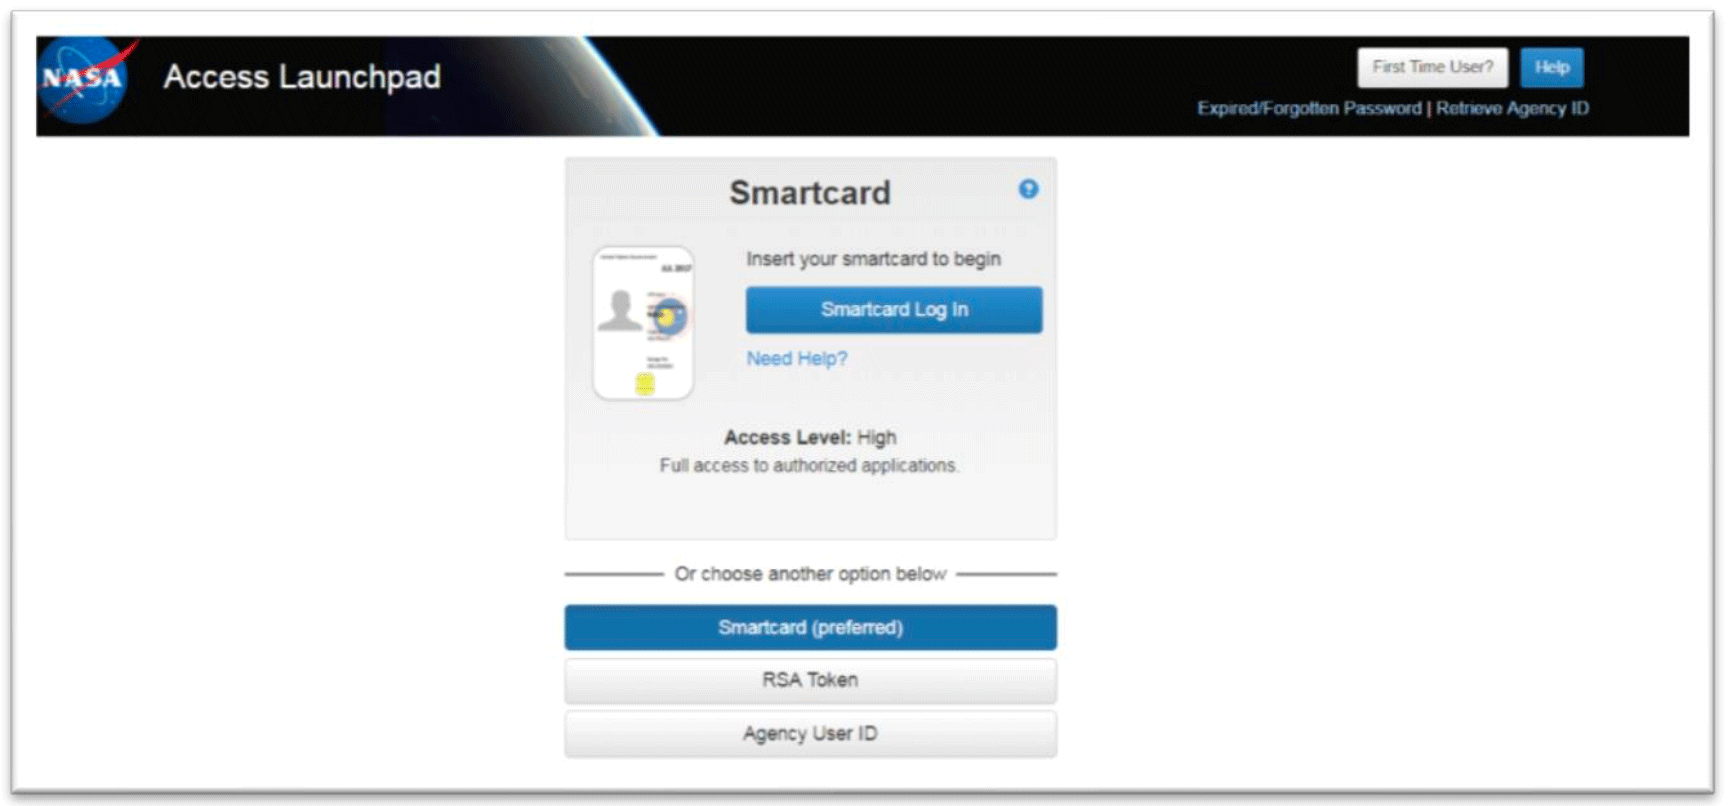
Note: You only have to register your Google account once with NASA. Once registered, you can use this google account to log in to both tools. - If you are a NASA LaunchPad user, click on the NASA LaunchPad Authenticate button (outlined in red below).
- You my use any of the options (Smartcard, RSA Token, or Agency User ID) to log in. Enter your information and it will direct you to the GeneLab tool.
Collaborative Workspace
GeneLab provides each user with a workspace to manage files and access data analysis tools. To access the workspace, users will need to create an account. Within this framework, users can share data files and analysis results with other users and/or groups, have access to the data in the GeneLab public repository, and data analysis tools.
- On the GLDS home page, select Collaborative Workspace

- Log in using your Google account or NASA credentials. See User Account section above.
- The Collaborative Workspace home page (https://genelab-data.ndc.nasa.gov/jsui) opens and includes a Welcome to NASA GeneLab popup (shown below).
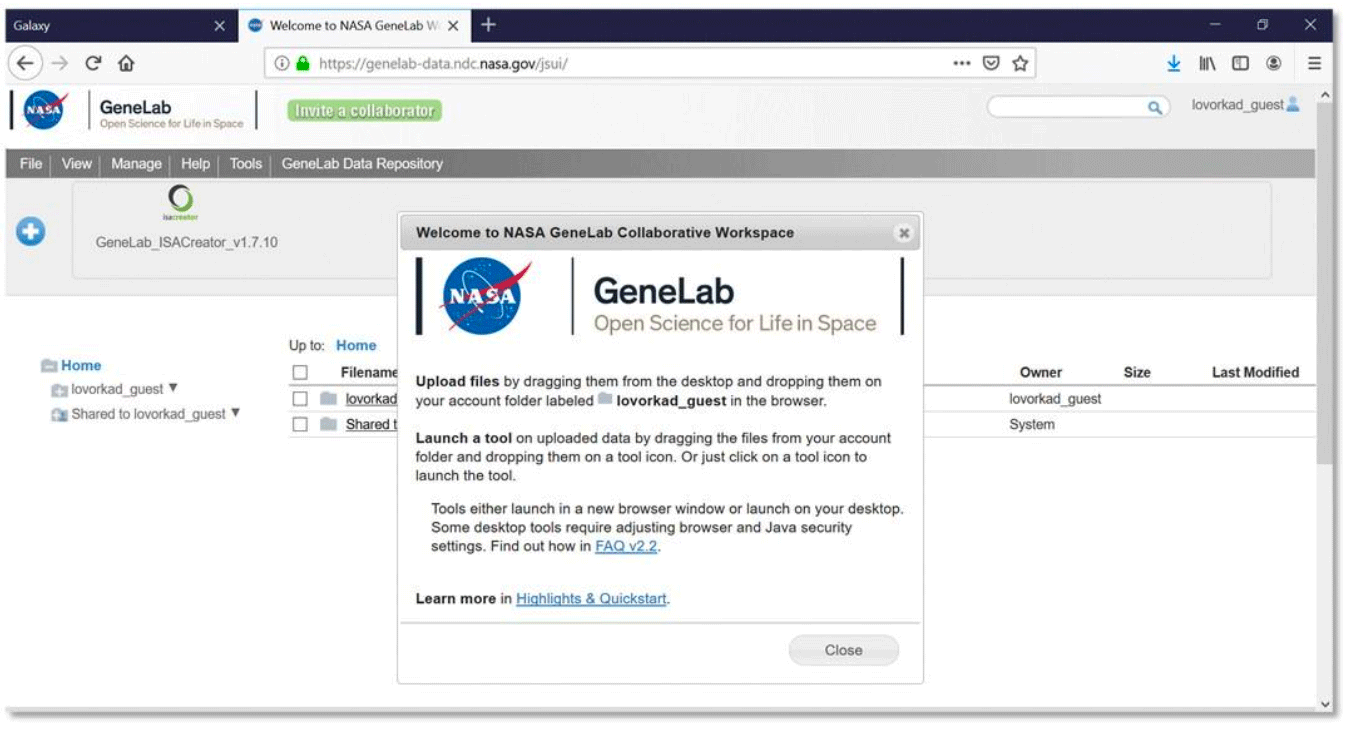
- Click Close or the “x” at the top right of the popup to dismiss the welcome dialog box.
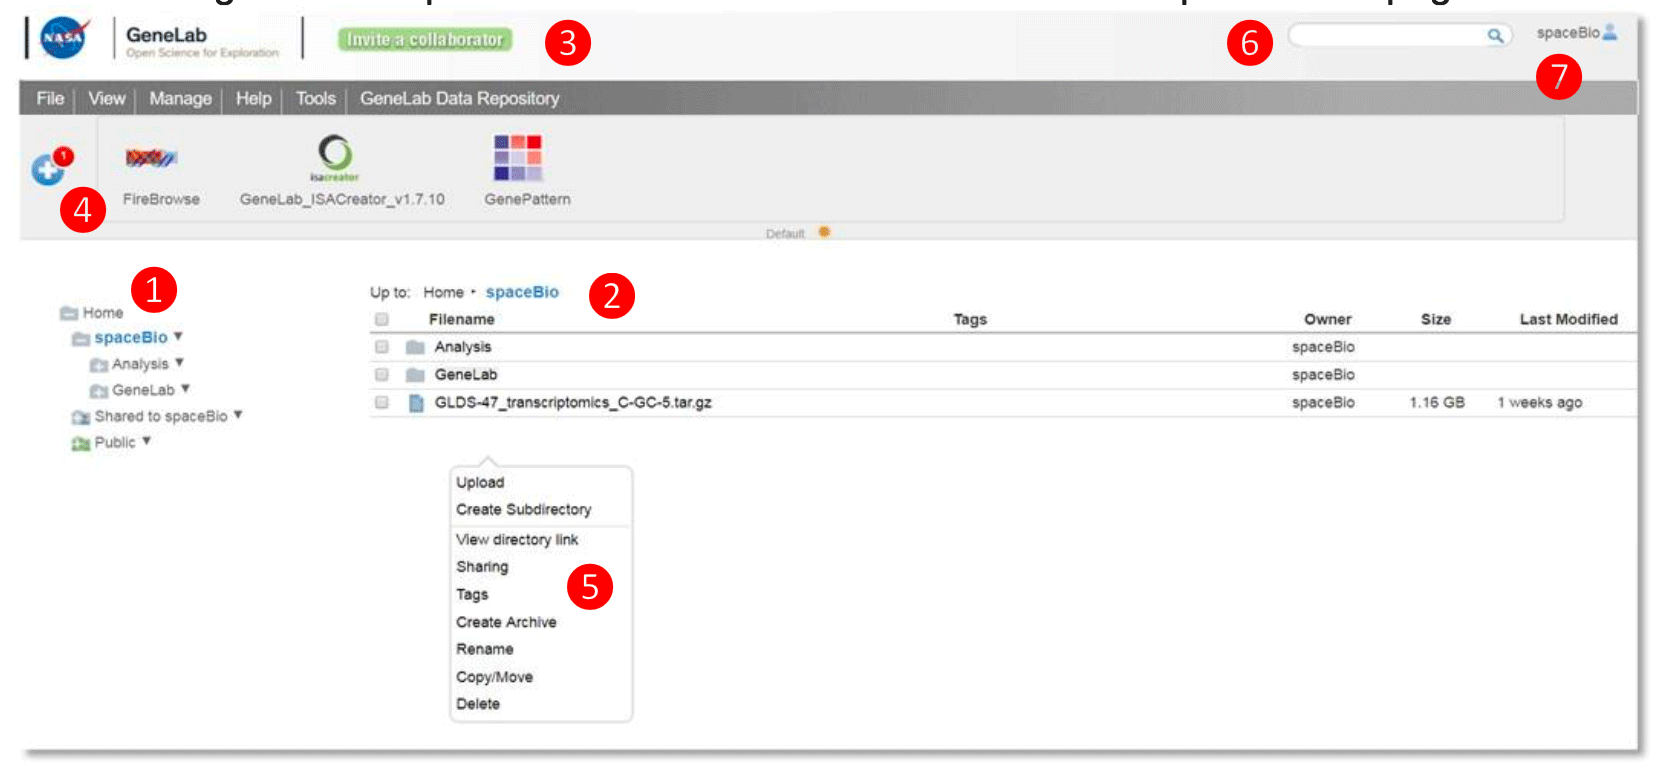
Workspace User Interface
https://genelab-data.ndc.nasa.gov/jsui/
The following is a description of the features of the GeneLab Workspace home page.

Example: GeneLab Collaborative Workspace
① Left directories panel – provides an overview of directories and files
User private folder: username folder (spaceBio in this example) contains folders and files visible only to the user
Shared folder: Shared to username folder contains folders and files shared from other users
② Main files panel – lists the files within a selected folder
③ Navigation menu – organizes functions for managing files and groups, launching tools, accessing user guides, and links to the GeneLab Data Repository
④ Toolbar – displays tools and data sources as interactive icons that, when clicked, will launch the tool
⑤ ‘Right-click’ pop-up menu – provides menu options to manage selected file(s) or folder
⑥ Search bar – searches folders and file names for descriptions and tags within your workspace
⑦ User profile – click here to find profile information, history, and to log out
Manage folders and files
Use the left directories panel to manage your private and shared folders and to expand the public folder. Click on the folder icon to expand or collapse the folder. You can manage your 32 Last updated: 2/2021 Last updated: 2/2021 folders by clicking on the triangle icon to the right of the folder name (circled below), by right- clicking on the folder name, or by selecting the folder and using the File menu.
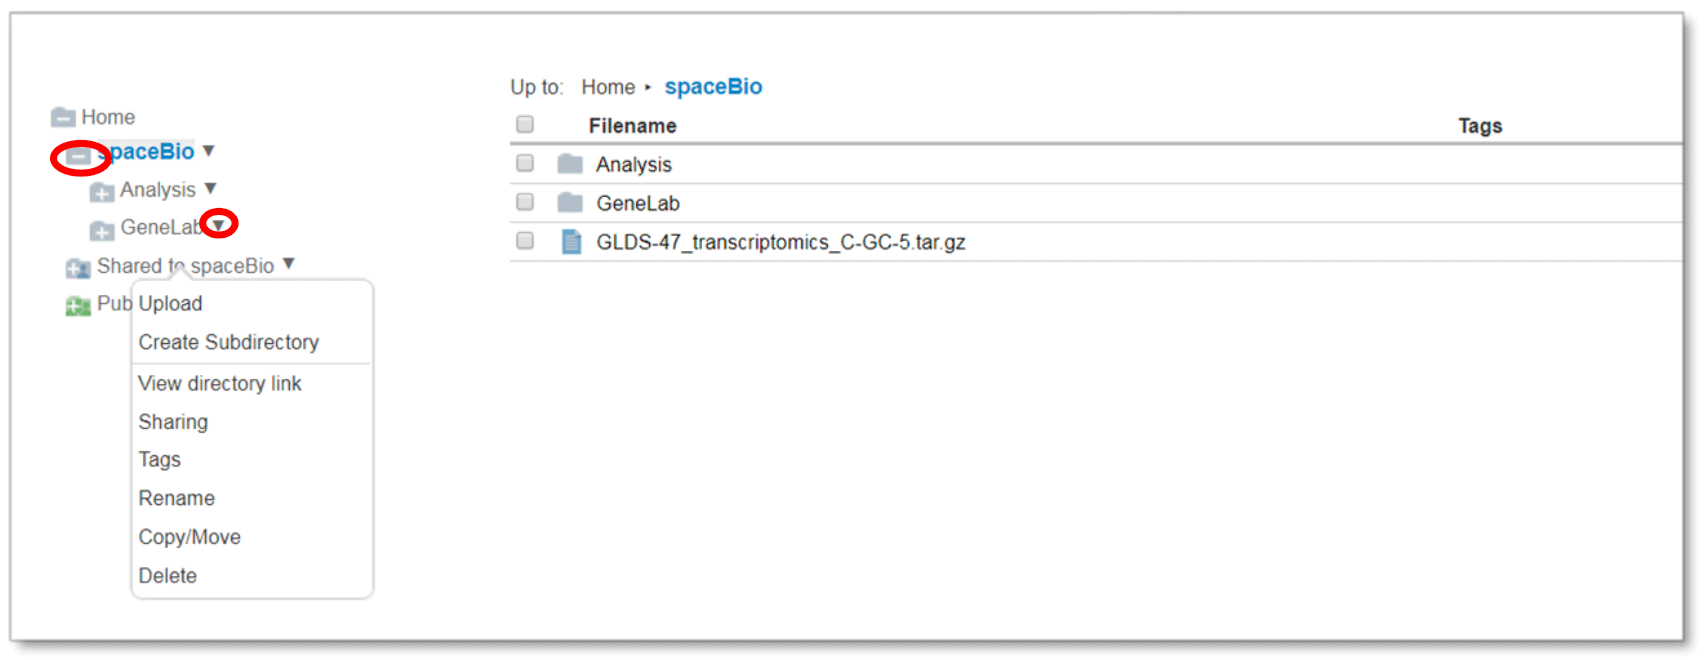
Upload function will prompt a pop-up informing the user to drag and drop file(s) into the workspace folder
Create Subdirectory creates a folder under the selected folder
View directory link provides a web link to the selected folder
Sharing provides options to share folder with colleagues and permission settings Use Tags to add searchable terms to your folder
Rename option can be used to edit or update a folder name
Copy/Move function provides the ability to copy or move a folder within your directory structure
Delete will delete a folder and all of its contents
Folder menu options are also available by right-clicking on the folder in the main files panel or selecting the folder and using the File menu.
Navigate to the desired directory or subdirectory. In the main files panel, manage your files by right-clicking on the folder name, or by selecting the file and using the File menu.
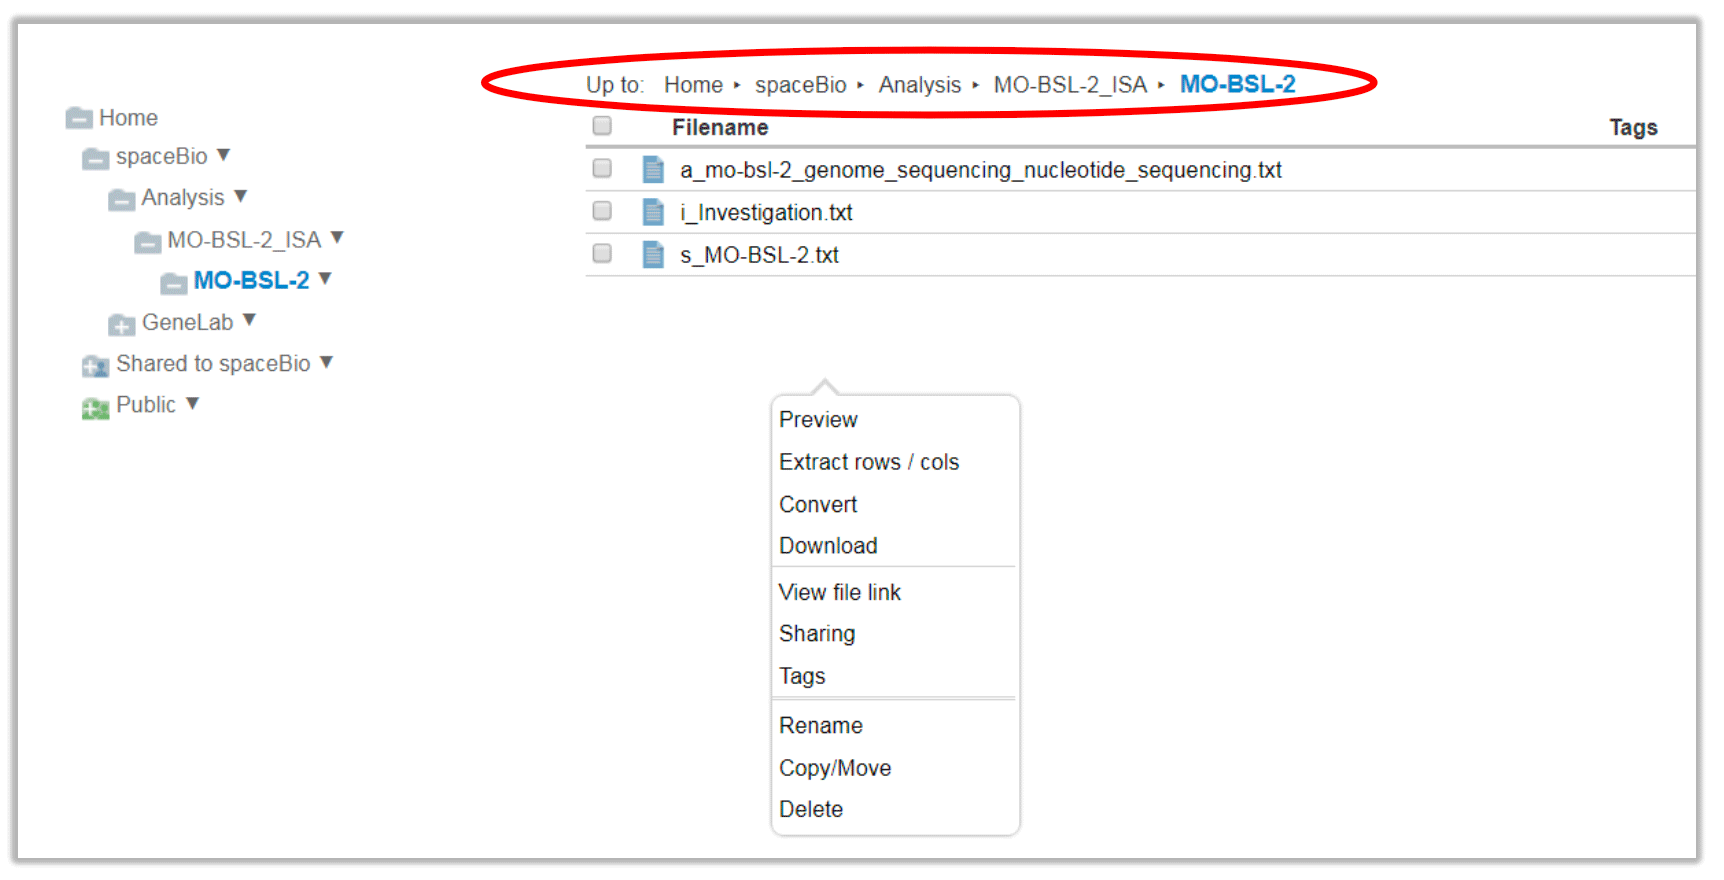
File menu is similar to the folder function options stated above. Additional functions include:
Preview text-based files
Extract rows or columns from a tab- or comma-delimited file and save to a new file
Convert a file to another file format
Download the selected file(s) to your local machine
Expand Archive will extract the compressed file into a specified directory (option not shown in snapshot)
Upload files and manage storage
To upload a file to your account, import the file by dragging-and-dropping the file from your local computer to the desired folder or import the file using the URL option (examples shown below).
Drag-and-drop your file from your desktop to the selected directory in the main file panel. Drop the file when the selected area is green.
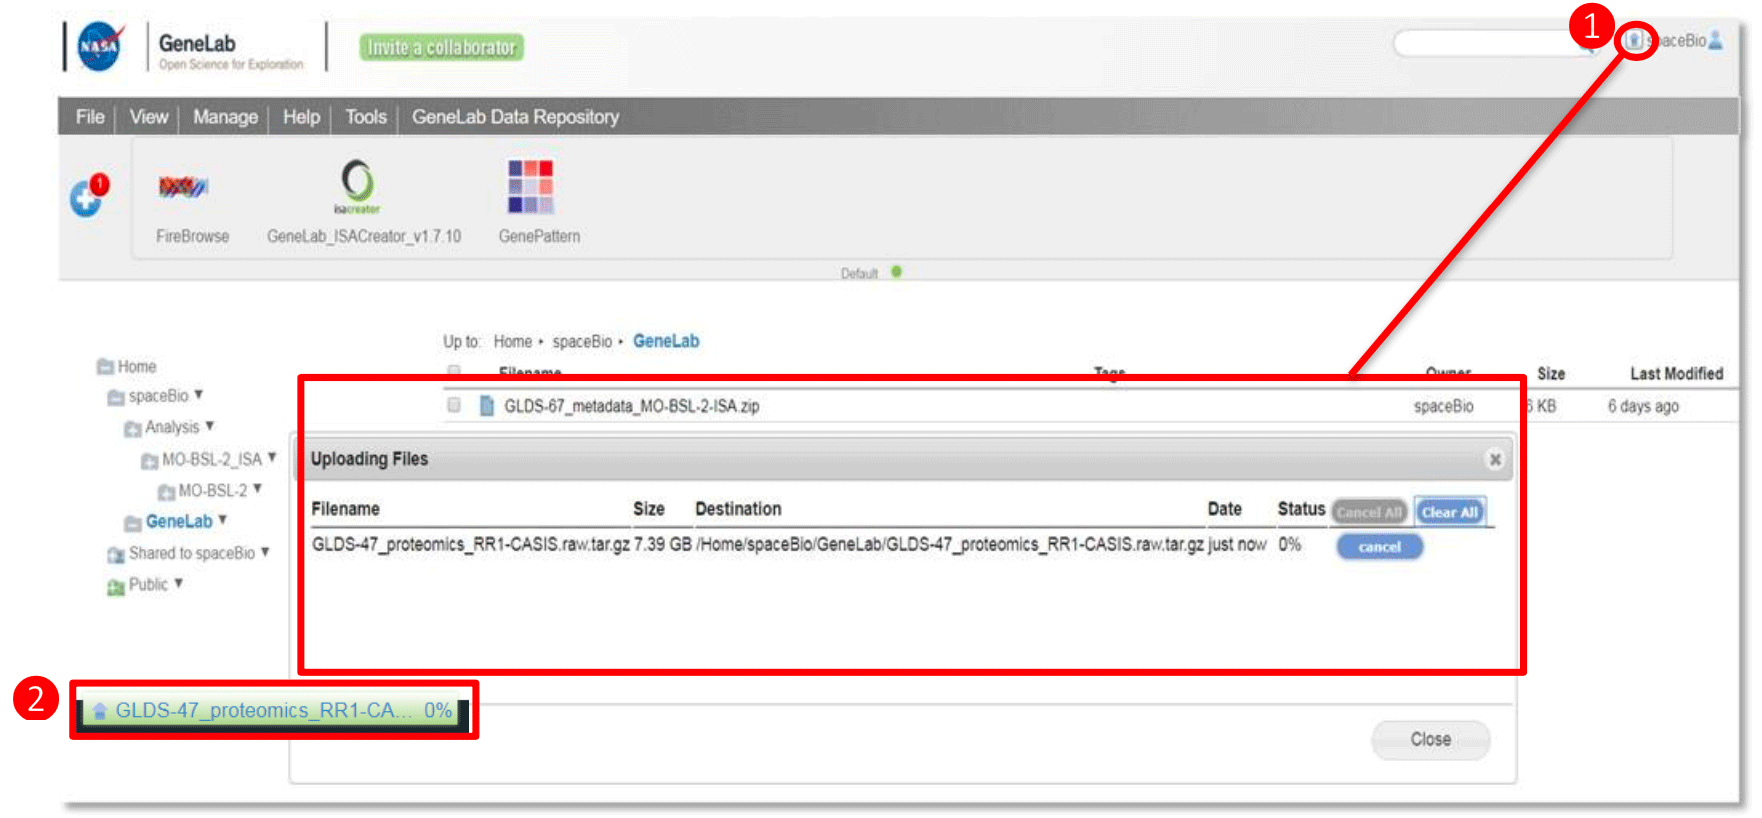
Upload progress can be viewed by:
- Click on the ‘up arrow’ on the top right of the page next to the profile icon. A pop-up window will provide a history of uploaded files and the status of the current upload
-
Percentage progress bar at the bottom of the browser
To import from a URL, go to File and select Import from URL. Provide a URL address, copy and paste the link, or drag and drop the URL address. Click the ‘Go’ button.
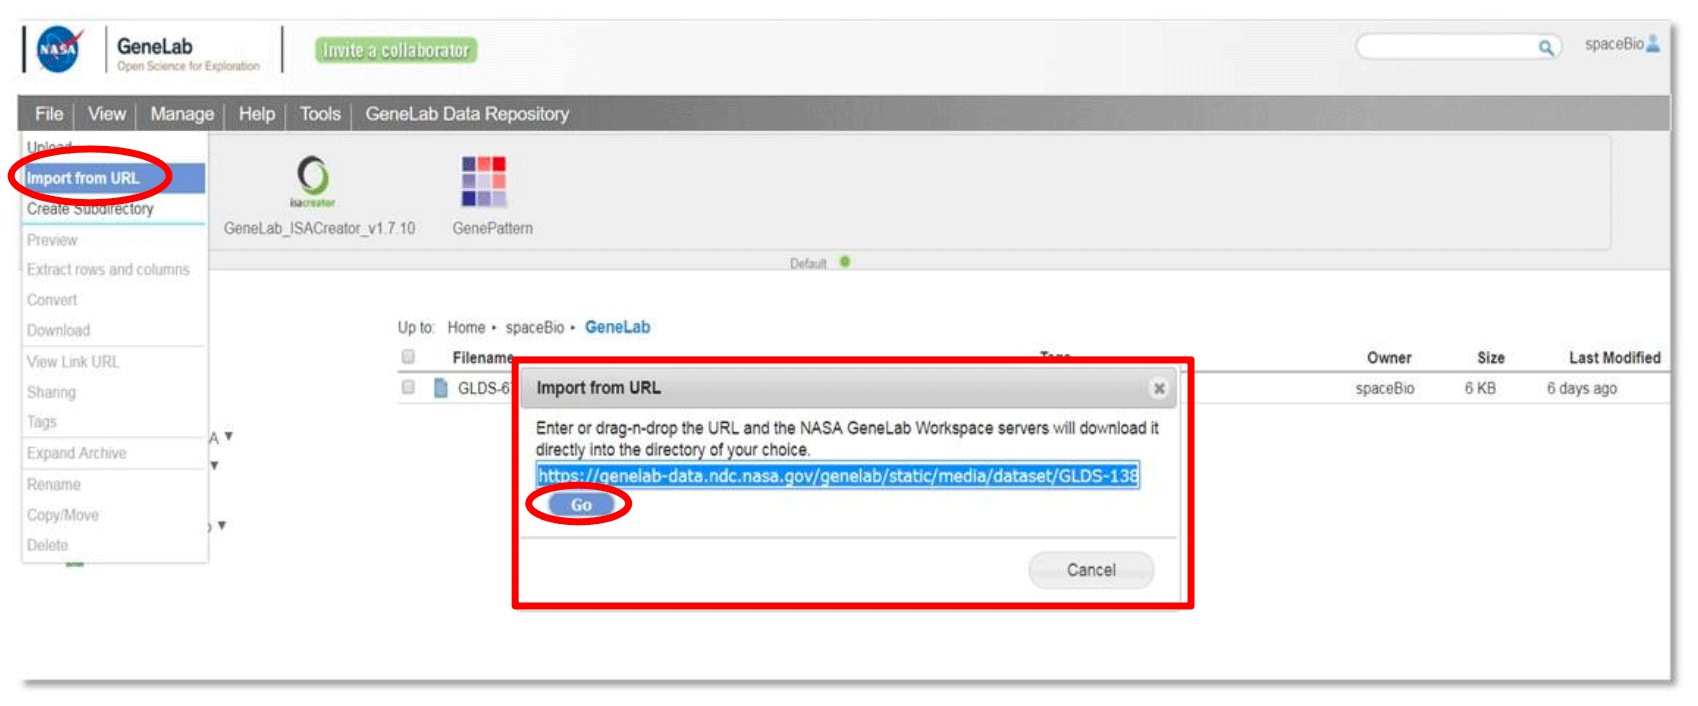
A dialog box will open in a new window (see example below), select the destination folder and edit the file name if desired. Click Submit. View percentage progress bar at the bottom of the browser to monitor the file upload status (green: upload in progress; white: upload completed; red: error during upload)

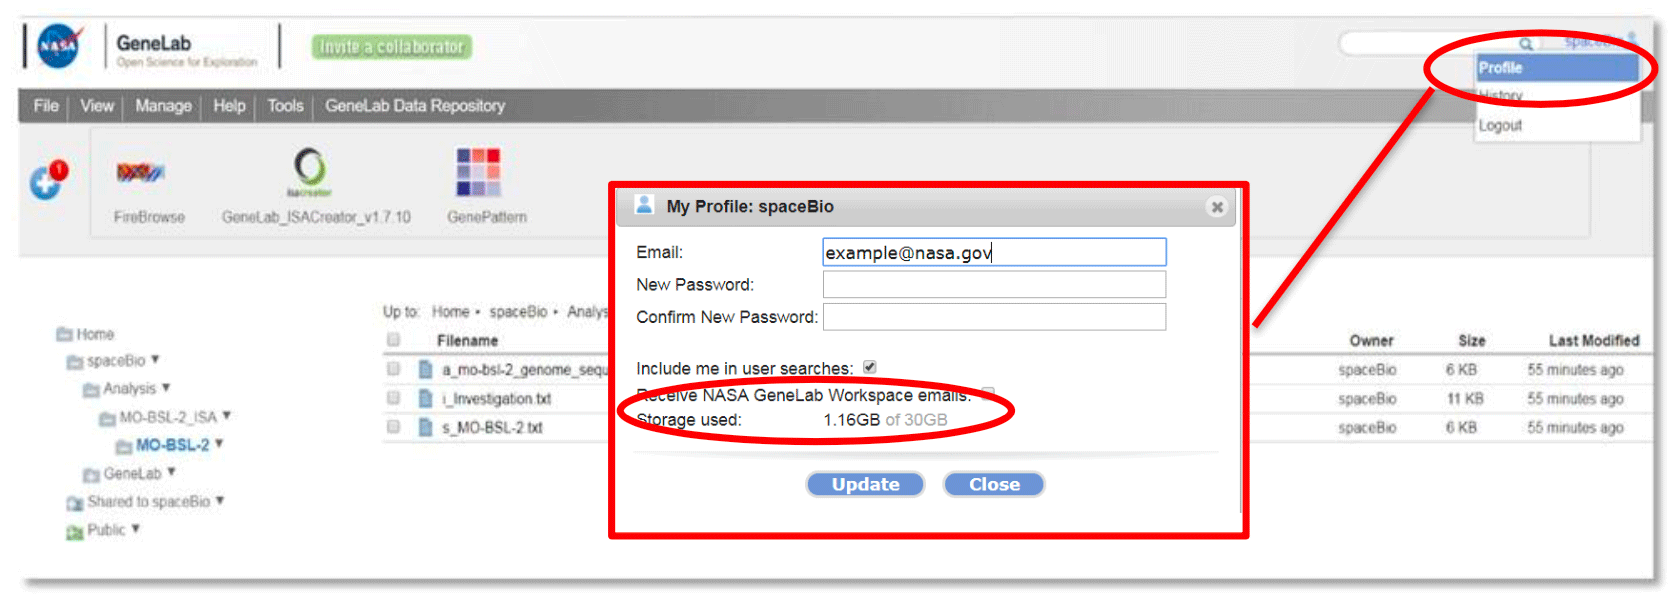
Please note, if you exceed the storage quota of 30 GB, you will receive a pop-up message to remove some files. If your project requires more space, please contact us at arc-dl-genelab-it@mail.nasa.gov with your specific needs and provide justification for your request.
To check how much storage you are using, click on your user account name on the top right- hand corner and select Profile as shown below.
Copy/Move folders and files
Copy and/or move functions are available only to directories for which you have read/write permissions.
To Copy files/folders, you need read permission. Once copied into a private workspace, the user can manipulate the file.
- Right-click the file name and select Copy/Move from the pop-up menu. Click Copy.
- Check the file(s)/folder(s) you want to Copy/Move and select File menu > Copy/Move. Select the destination then click Copy.
To Move files/folders, you need read and write permissions.
- Drag and drop the file/folder into another directory in either the main files panel or the left directories panel.
- Right-click the file name and select Copy/Move from the pop-up menu. Click Move.
- Check the file(s)/folder(s) you want to Copy/Move and select File menu > Copy/Move. Select the destination then click Move.
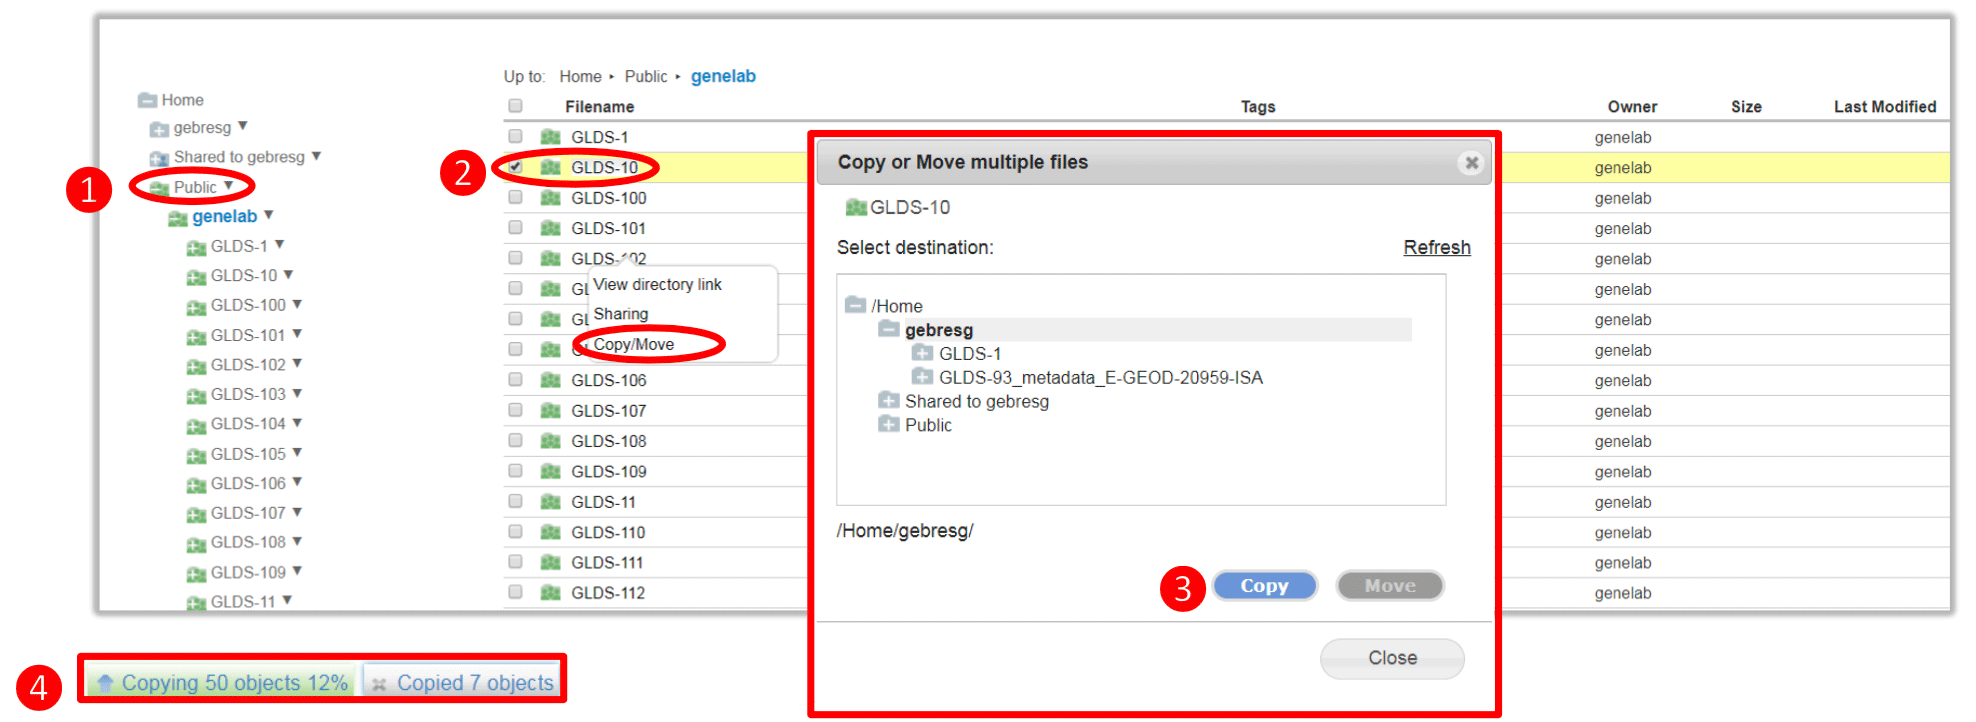
- Expand the public folder in the left directories panel
- Select the folder/file to copy and right click and select Copy/Move from the pop-up menu
- Select the destination and click Copy
- View file copy progress on the bottom left corner of the browser
Once completed, the copied folder/file will be available in the selected directory.
Share data and manage groups
You may share folders and data files by inviting your collaborators to sign up for a GeneLab user account or share with other GeneLab users.
To invite your colleagues to join GeneLab, click the Invite a collaborator button on the top of your workspace page (circled in red below).

File and folder sharing settings can be accessed by selecting the file/folder you want to share and selecting File > Sharing or by right-clicking on file/folder then selecting Sharing.
The Sharing & Permissions dialog box (shown below) includes:
- file/folder name
- the owner
- users with which items are shared, including the owner and level of privilege
- Edit Sharing button
- Close button
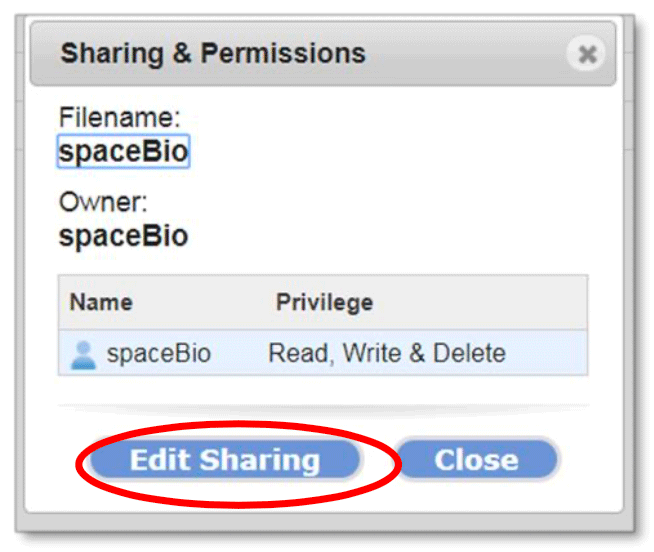
Click on the Edit Sharing button to open, change, or add sharing and permission settings. The two levels of permissions are Read, which allows only copying, and Read, Write, & Delete, which allows copying, moving, and editing of the folder/files. An example is shown below.
- Lists the file/folder name to be shared.
- Lists the shared user or group name(s) and privileges. Click the red x to remove the current permissions.
- To Share with User, enter the username and select the privilege level. To find a user, enter the username or email and select the magnifying glass icon.
- To Share with Group, select a group and the privilege level. To manage groups, click on the
 icon. See next section below.
- Check the box to notify users or groups of the file(s)/folder(s) to be shared. An email will be sent to those user(s).
- To save changes, click the Grant Permissions button.
To manage groups, select Manage from the top navigation menu or click on the icon in the Edit Share & Permission dialog box (from Step 4 above). An example is shown below

- List of groups in which you are a member are displayed under Group Names. Click on the group name, to view and edit the group members.
To delete a group, click Delete Selected Group button (admins only) - To create a new group, enter the Group name and description and click Add New Group.
- Lists the group members in the selected group from step 1. Click on the red x to remove a member from that group.
- To add a user to the selected group, enter the username. To find a user, click on the magnifying glass and enter the username or email; find and click Select.
Check the User can administrator group box to make a user a group administrator. - Click Close. Follow steps 5 and 6 from the section above; Click Grant Permission to save changes.
Integrated Search and Federation APIs
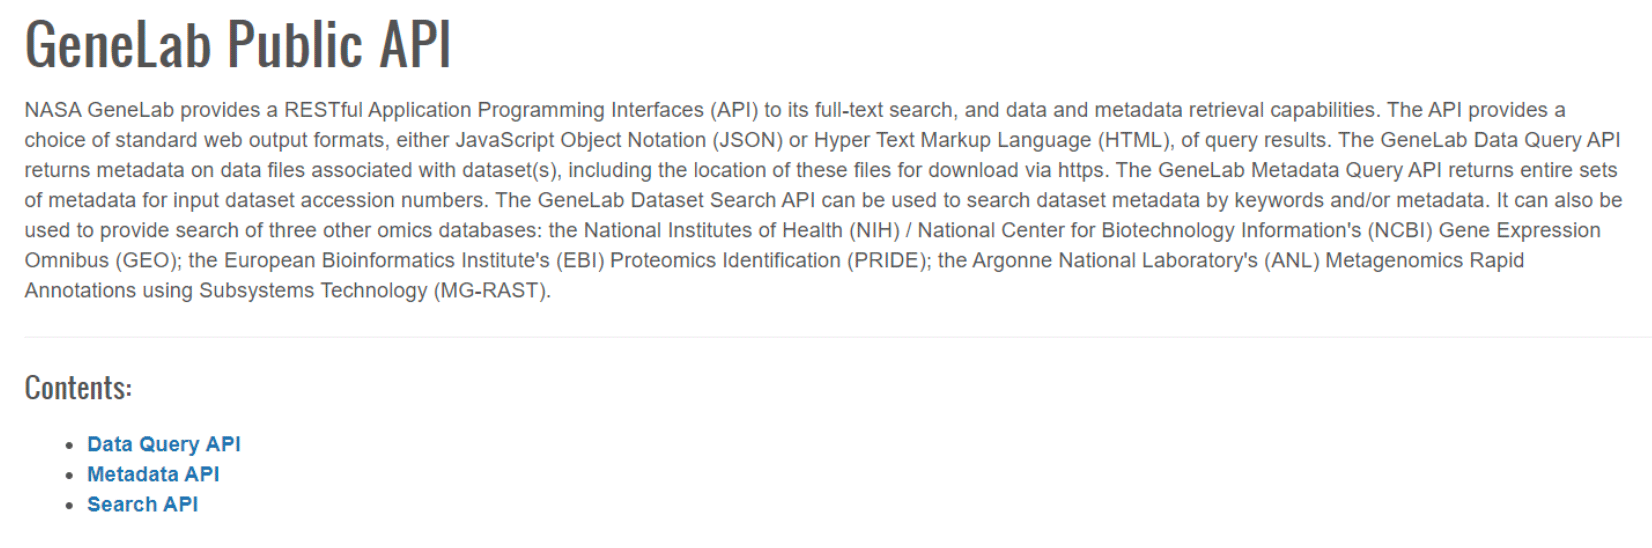
NASA GeneLab provides a RESTful Application Programming Interfaces (API) to its full-text search, and data and metadata retrieval capabilities. The API provides a choice of standard web output formats, either JavaScript Object Notation (JSON) or Hyper Text Markup Language (HTML), of query results. The GeneLab Data Query API returns metadata on data files associated with dataset(s), including the location of these files for download via https. The GeneLab Metadata Query API returns entire sets of metadata for input dataset accession numbers. The GeneLab Dataset Search API can be used to search dataset metadata by keywords and/or metadata.
Navigate to Data & Tools on the top menu and click on GeneLab APIs (https://genelab.nasa.gov/genelabAPIs)
Click on the links under Contents to navigate to the instructions and examples for each type of API available.
Data Submission Portal
The GeneLab Environment for Online Data Entry (GEODE) is a web-based system that accepts submission of omics data from space relevant experiments including spaceflight, radiation, simulated gravity, gravitropism, isolation and confinement, hostile closed environments and/or distance from Earth. GeneLab accepts studies whose design, assays and data types match those listed in the GEODE homepage.
- From the GLDS homepage, select Submit Data
- Log in using your email address and password. See User Accounts section above.
- The GEODE home page (https://genelab-data.ndc.nasa.gov/geode-sso-login/) will open (see below).
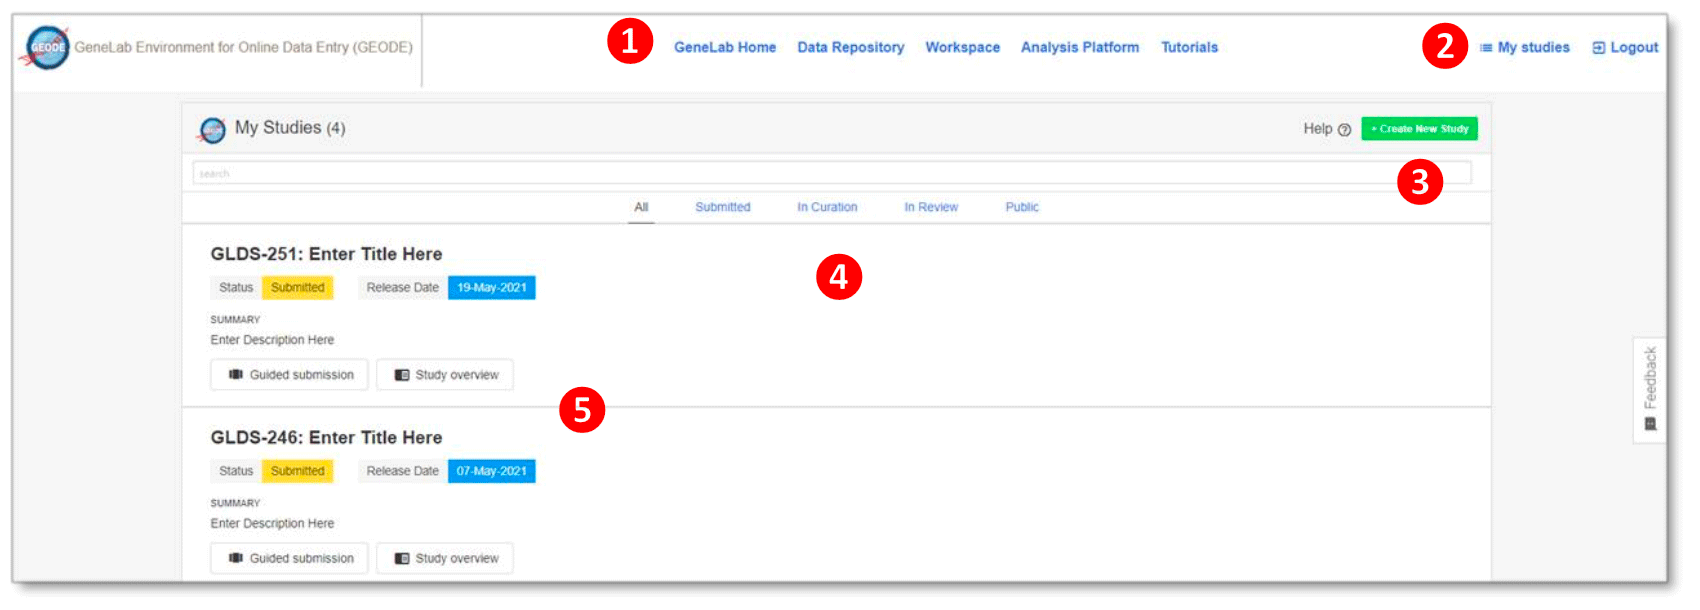 Example: GEODE homepage after login.
The following is a description of features of the GEODE home page:
GeneLab Home: Link navigates user to the GeneLab homepage.
Data Repository: Link navigates user to the GeneLab data repository.
Workspace: Allows user to manage files.
Tutorials: Links to all the featured tutorials, Frequently Asked Questions (FAQs), troubleshooting tips for GLDS and contact information for GeneLab.
All: shows data that is in various stages of submission.
Submitted: link allows users to see only data that has been submitted.
In Curation: link shows only data that is in curation.
In Review: allows user to only see data that is in review.
Public: shows all data that is public.
- GEODE navigation menu – click on any of the options to navigate through the different tabs:
- My studies – allows user to view current studies submitted via GEODE. Users can logout using the “logout” link.
- Create new study – link that allows user to create a new study while incorporating experimental factors. The help link to the left provides GeneLab contact information in the event of technical difficulties.
- “My studies” navigation menu – click on any of the options to navigate through the different tabs:
- Summary of data corresponding to the link from the “My Studies” navigation menu.
You can find a tutorial on how to submit data through GEODE using the following link:
Please review our FAQ page or send any inquires/questions to arc-dl-genelab-outreach@mail.nasa.gov.